


































Go2Clock: In- en beheren van 2FA
Cybersécurité wordt steeds belangrijker naarmate bedreigingen blijven evolueren. De mogelijkheid tot tweefactorauthenticatie (2FA) biedt een extra veiligheidslaag door te voorkomen dat onbevoegde gebruikers toegang krijgen tot belangrijke en gevoelige gegevens die in uw Go2Clock-account zijn opgeslagen. Hiervoor is het nodig dat gebruikers hun identiteit verifiëren met een code die naar hun e-mailadres wordt verzonden wanneer ze zich aanmelden.
Go2Clock ondersteunt momenteel 2FA via verificatie via e-mail.
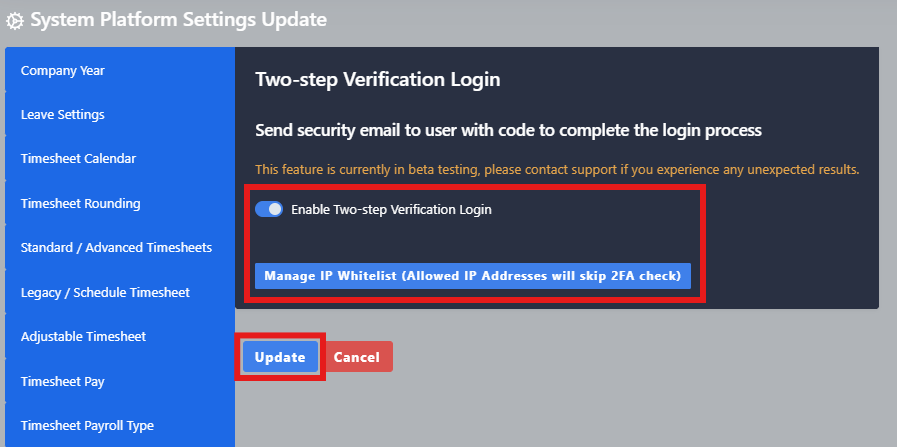
Stap 1: Schakel 2FA in
- Navigeer naar Systeeminstellingen
- Selecteer Systeemconfiguraties
- Selecteer de 2FA – Twee-stapsverificatie tab
- De 2FA-functie inschakelen
- Selecteer Update Om de wijzigingen op te slaan
Zodra deze functie is geactiveerd, ontvangt elke gebruiker die zich bij Go2Clock aanmeld een verificatiecode per e-mail. Deze code moet door de gebruiker ingevoerd worden om het aanmeldproces te voltooien. 2FA-codes blijven 10 minuten actief voordat ze verlopen.
Stap 2: Voeg het in de whitelist geplaatste IP-adres toe
Je kunt IP-whitelisting configureren vanuit hetzelfde tabblad 'Two Step Verification'. Hierin kun je vertrouwde publieke IP-adressen specificeren waarmee gebruikers toegang krijgen tot Go2Clock zonder dat ze de 2FA-codes hoeven in te voeren.
- Navigeer naar Systeeminstellingen → Systeemconfiguratieinstellingen → Tabblad 2FA – Twee-staps verificatie
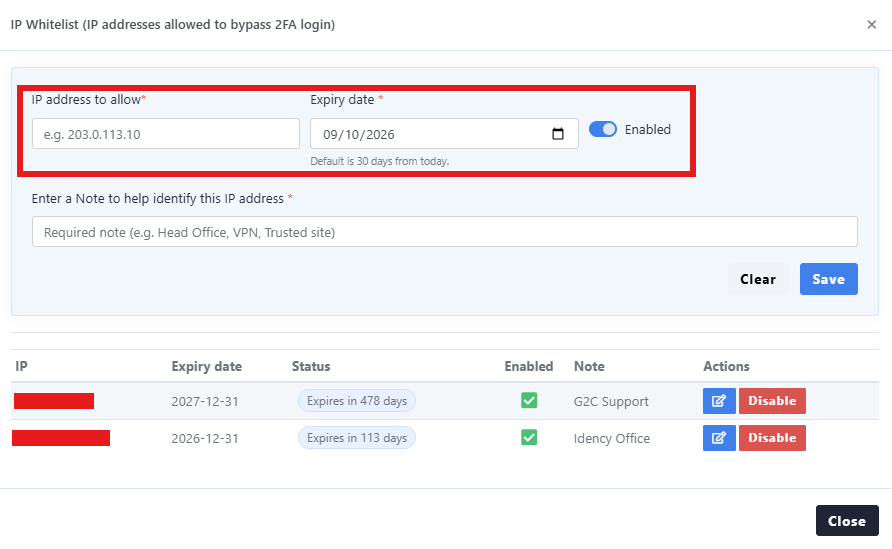
- Selecteer IP-whitelist beheren
- Voer het publieke IP-adres in dat toegestaan moet zijn om Go2Clock te benaderen zonder 2FA
- Stel de vervaldatum in
- Voer een opmerking in om aan te geven welke locatie is opgenomen in de whitelist.
- Selecteer Sla Om de whitelist te creëren
Gelezen IP-adressen kunnen worden uitgeschakeld of hun vervaldatum worden gewijzigd vanuit het venster 'IP-whitelist beheren'.
Een publiek IP-adres verschilt van het interne IP-adres dat aan individuele computers of apparaten in het netwerk van uw bedrijf is toegewezen. Als u niet zeker weet welk publiek IP-adres u moet gebruiken, neem dan contact op met uw IT- of netwerkbeheerder.
Heb je hulp nodig bij het instellen van 2FA in Go2Clock?
Als u vragen heeft over het inschakelen van 2FA of het beheren van uw whitelist met IP-adressen, staat ons supportteam u graag te woord.

Go2Clock Cloud Gehost Tijdregistratiesysteem

















 English (UK)
  English
  English (Canada)
  Français du Canada
  Svenska
  Português
  Nederlands
  Italiano
  Français
  Español
  Deutsch