


































Comprendre l'importation des congés PeopleHR dans Go2Clock
Avant d’utiliser PeopleHR Holiday Import, assurez-vous que la connexion API PeopleHR a été configurée dans Go2Clock et que les employés sont liés à leur identifiant PeopleHR. Si la connexion API n’a pas encore été configurée, veuillez vous référer à cet article de la base de connaissances : Comment connecter PeopleHR à Go2Clock
Section 1 | Lien employé vers PeopleHR
Accédez au tableau de bord des employés et sélectionnez Afficher. Recherchez l'employé que vous souhaitez vérifier et sélectionnez Modifier.
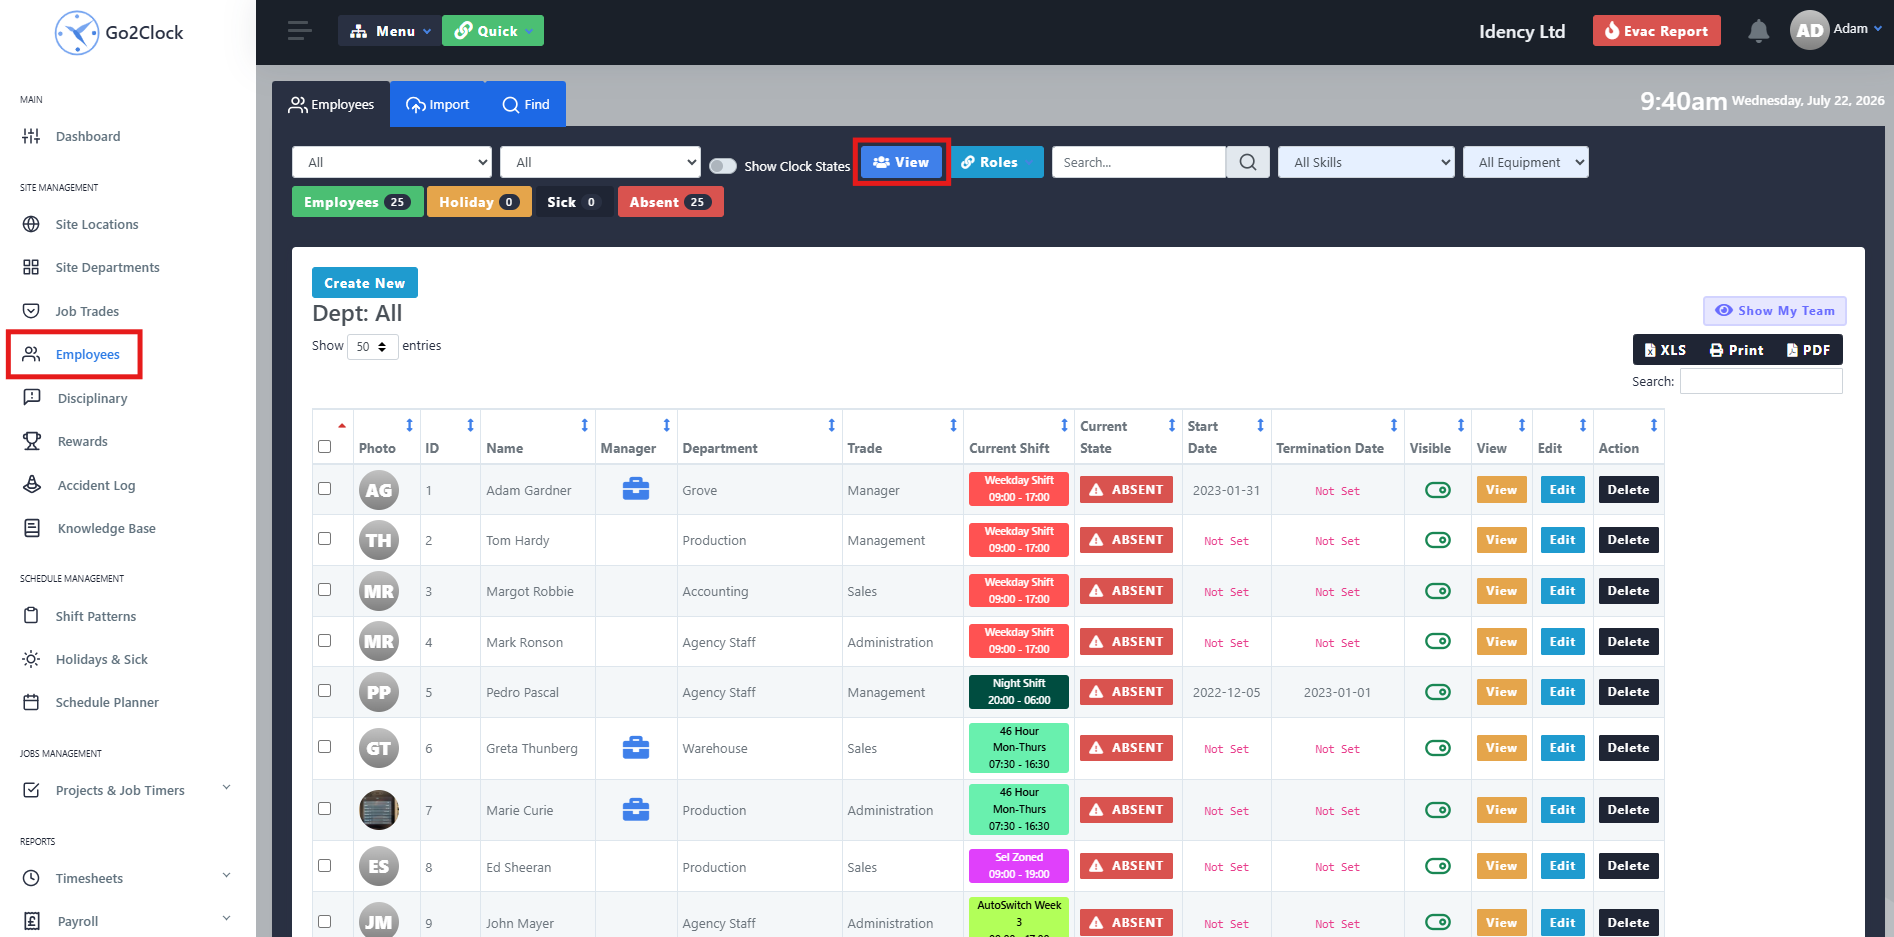
Étape 2 : Vérifiez l’ID d’employé de PeopleHR
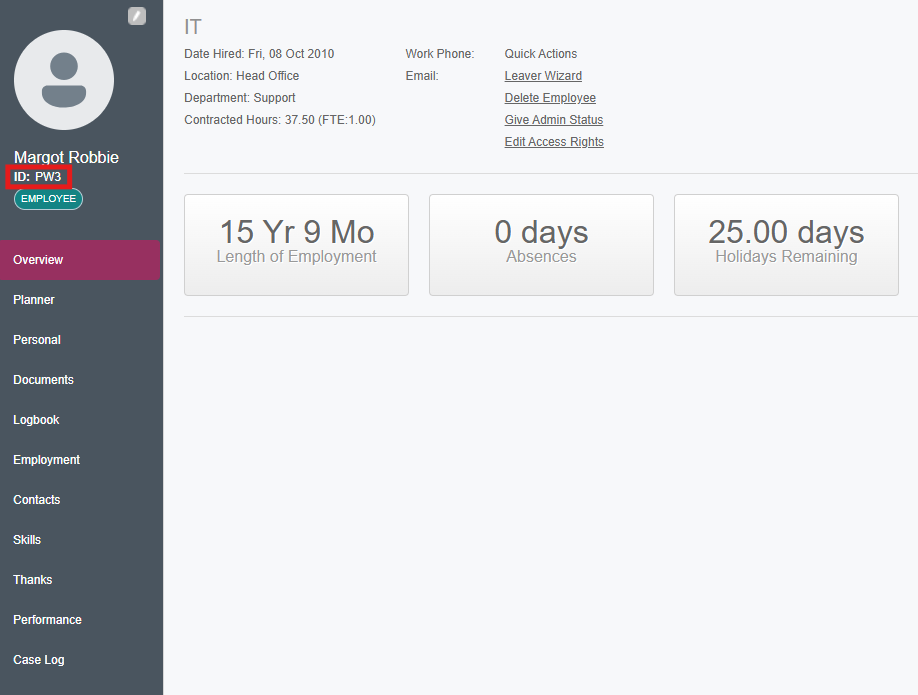
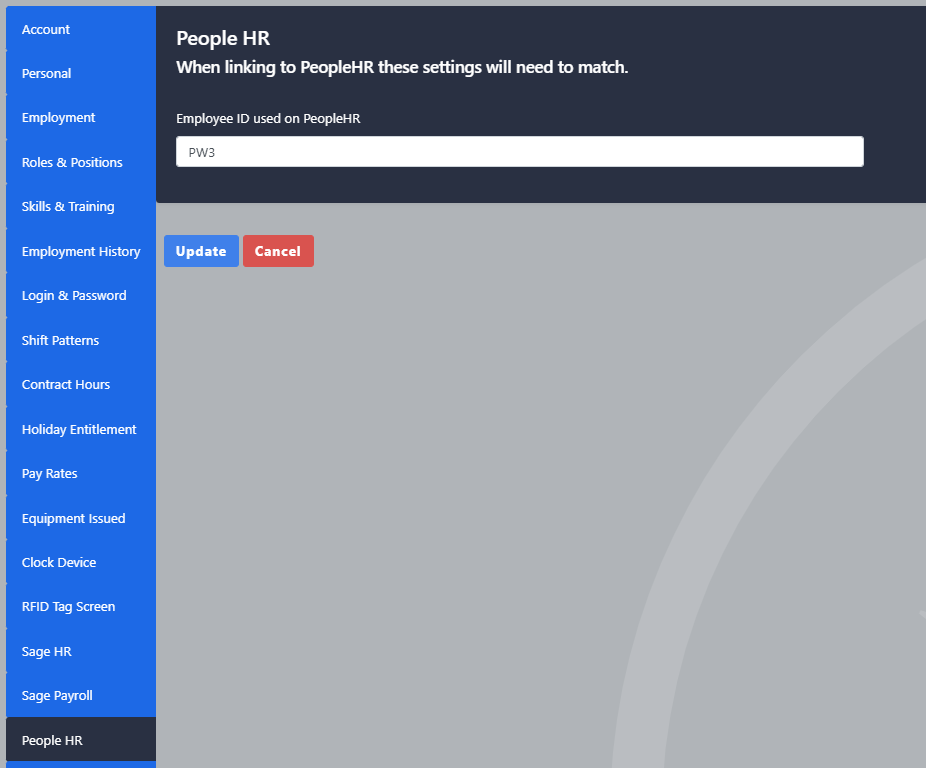
Dans les options de l’employé, accédez à l’onglet PeopleHR. Vérifiez que le champ « ID employé » de PeopleHR contient bien l’ID correspondant de PeopleHR. Si le champ est vide, entrez l’ID employé correct et actualisez l’employé.
Section 2 | Importation des congés dans Go2Clock
Étape 1 : Importer les congés de PeopleHR
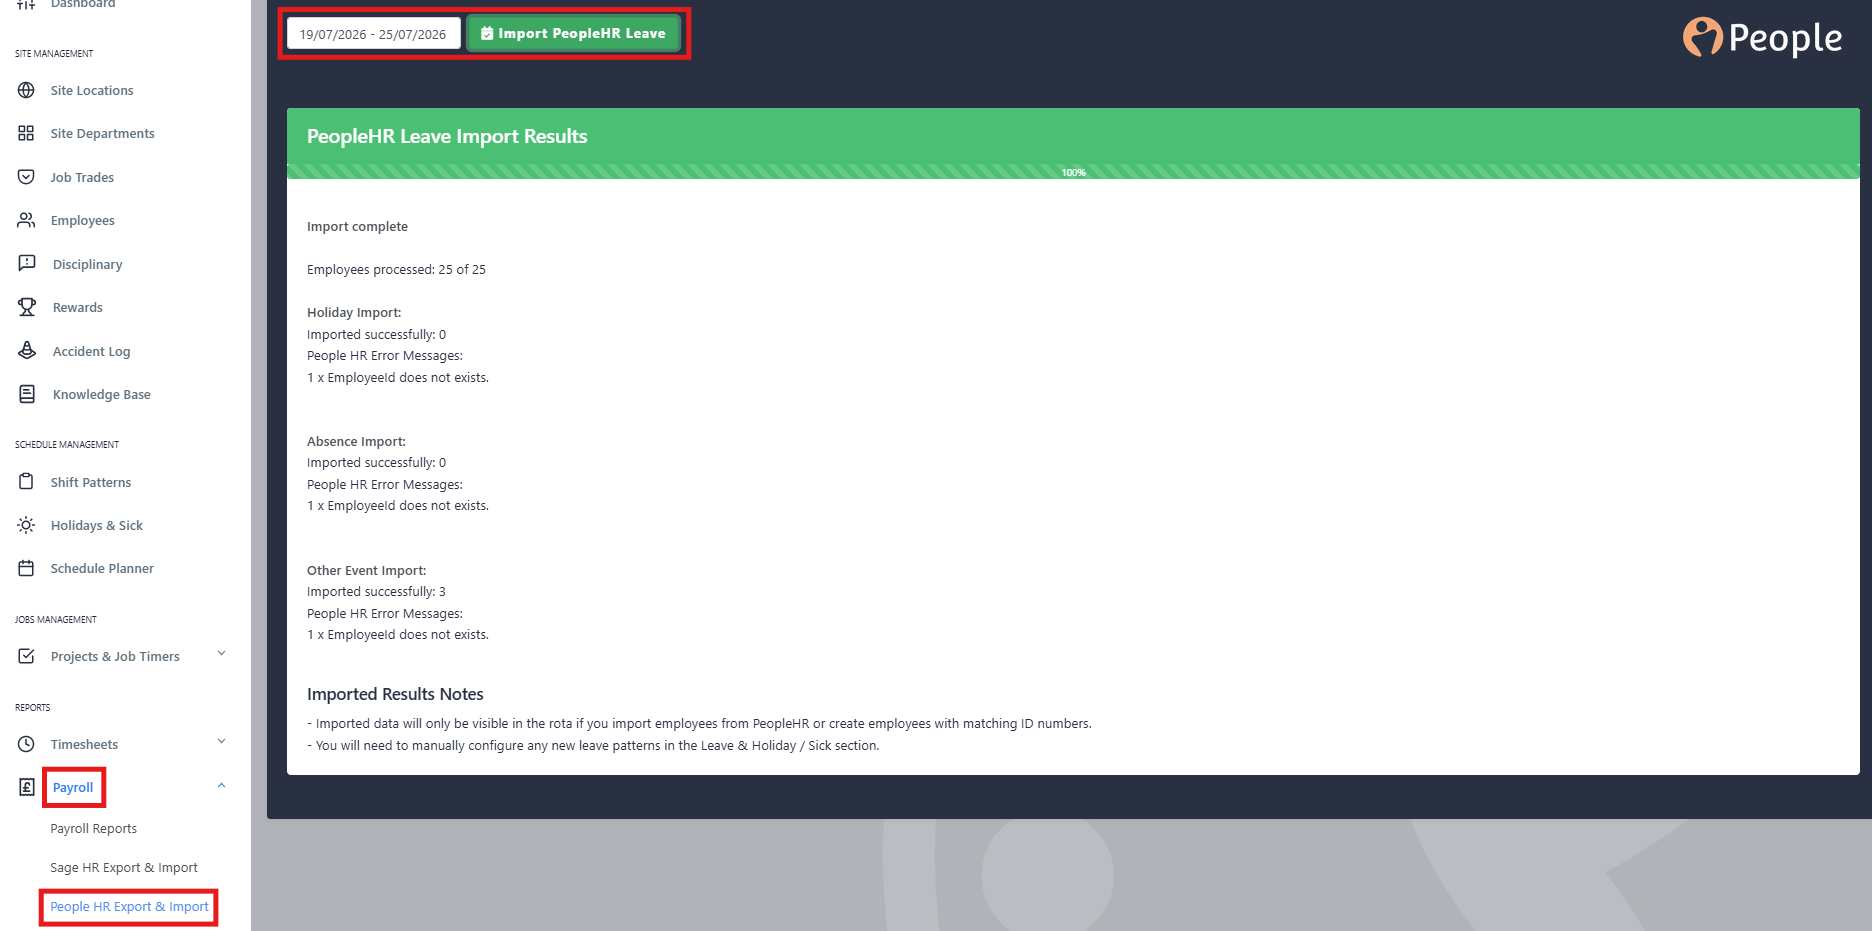
Accédez à la rubrique « Paie » et sélectionnez « PeopleHR Import & Export ». En haut de la page, sélectionnez « PeopleHR Import Leave ». Sélectionnez la période de date à partir de laquelle vous souhaitez importer les congés. Veuillez noter que les congés ne peuvent être importés qu’à un moment donné. Une fois sélectionné, cliquez sur « Import PeopleHR Leave ». Une barre de progression indiquera l’état de l’importation.
Une fois le processus terminé, vous verrez le nombre de feuilles de paye importées avec succès ainsi qu'une liste des congés manqués qui n'avaient pas encore été approuvés. Tous les nouveaux types de congés qui n'ont pas encore été importés dans Go2Clock devront être corrigés.
Étape 2 : Examiner les résultats de l’importation
Une fois le processus terminé, vous verrez le nombre de feuilles de paye importées avec succès ainsi qu'une liste des congés manqués qui n'avaient pas encore été approuvés. Tous les nouveaux types de congés qui n'ont pas encore été importés dans Go2Clock devront être corrigés.
Section 3 | Configuration de la journée de congé complète
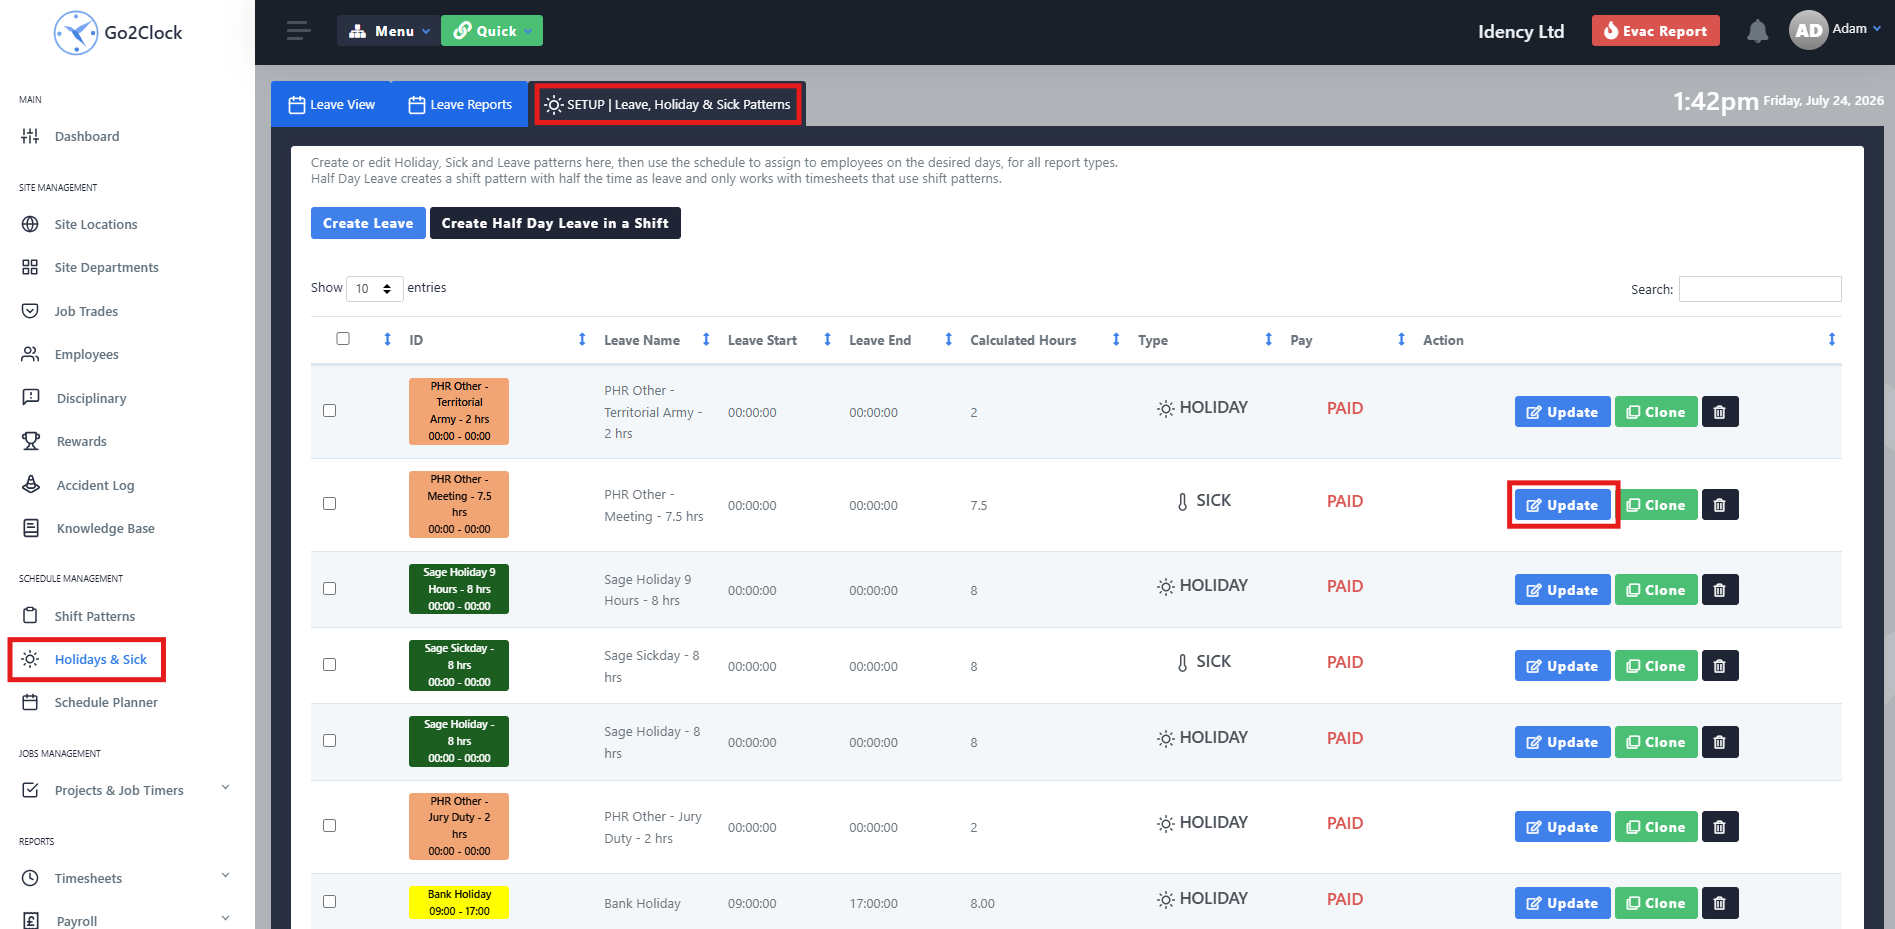
Accédez à l’onglet « Vacances et congés » et sélectionnez « Configuration | Départ, congés et jours de maladie ». Trouvez le modèle de congés créé et sélectionnez « Mettre à jour ». Remarque : Les autres événements de PeopleHR seront également intégrés comme modèle de congés.
Étape 2 : Configurer le modèle de congé d'une journée complète
Ne modifiez pas le nom du modèle car cela pourrait causer des problèmes inattendus. Sélectionnez l'onglet Heures de travail et vérifiez les heures de travail. Sélectionnez l'onglet Type de congé et confirmez si le congé doit être Rémunéré ou Non rémunéré, et assurez-vous que le type de congé correct (Jour férié ou Maladie) a été sélectionné.

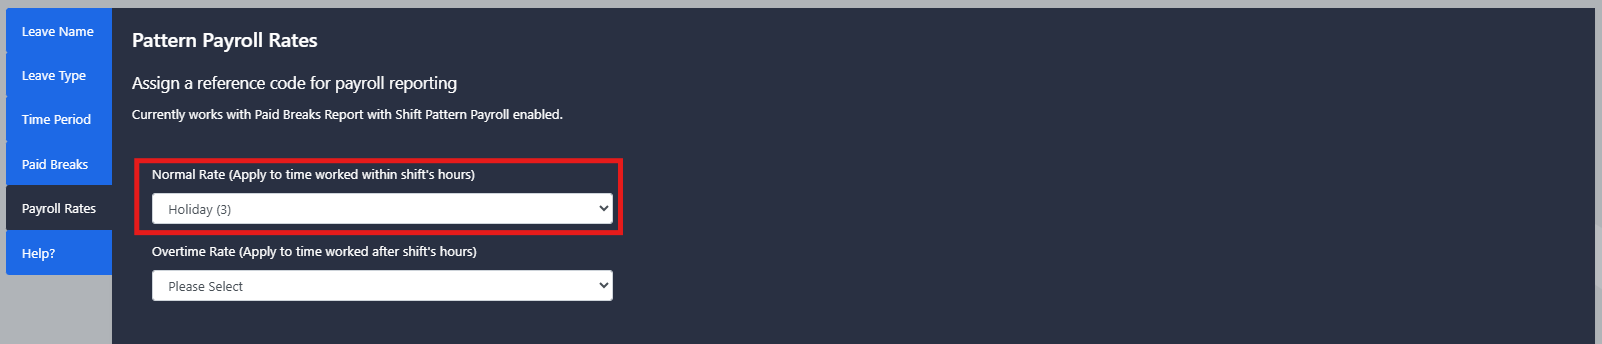
Étape 3 : Définir le taux de paie pour une journée complète
Si vous utilisez Sage Paie, sélectionnez l'onglet Taux de paie. Sous le taux normal, sélectionnez le code de taux de paie approprié à appliquer.
Section 4 | Configuration du congé de demi-journée
Accédez à « Modèles de décalage » et sélectionnez « Configurer les modèles de décalage ». Trouvez le modèle de décalage « Vacances » ou « Maladie » qui a été créé et sélectionnez « Mettre à jour ». N’alternez pas le nom du modèle car cela peut entraîner des problèmes non désirés.
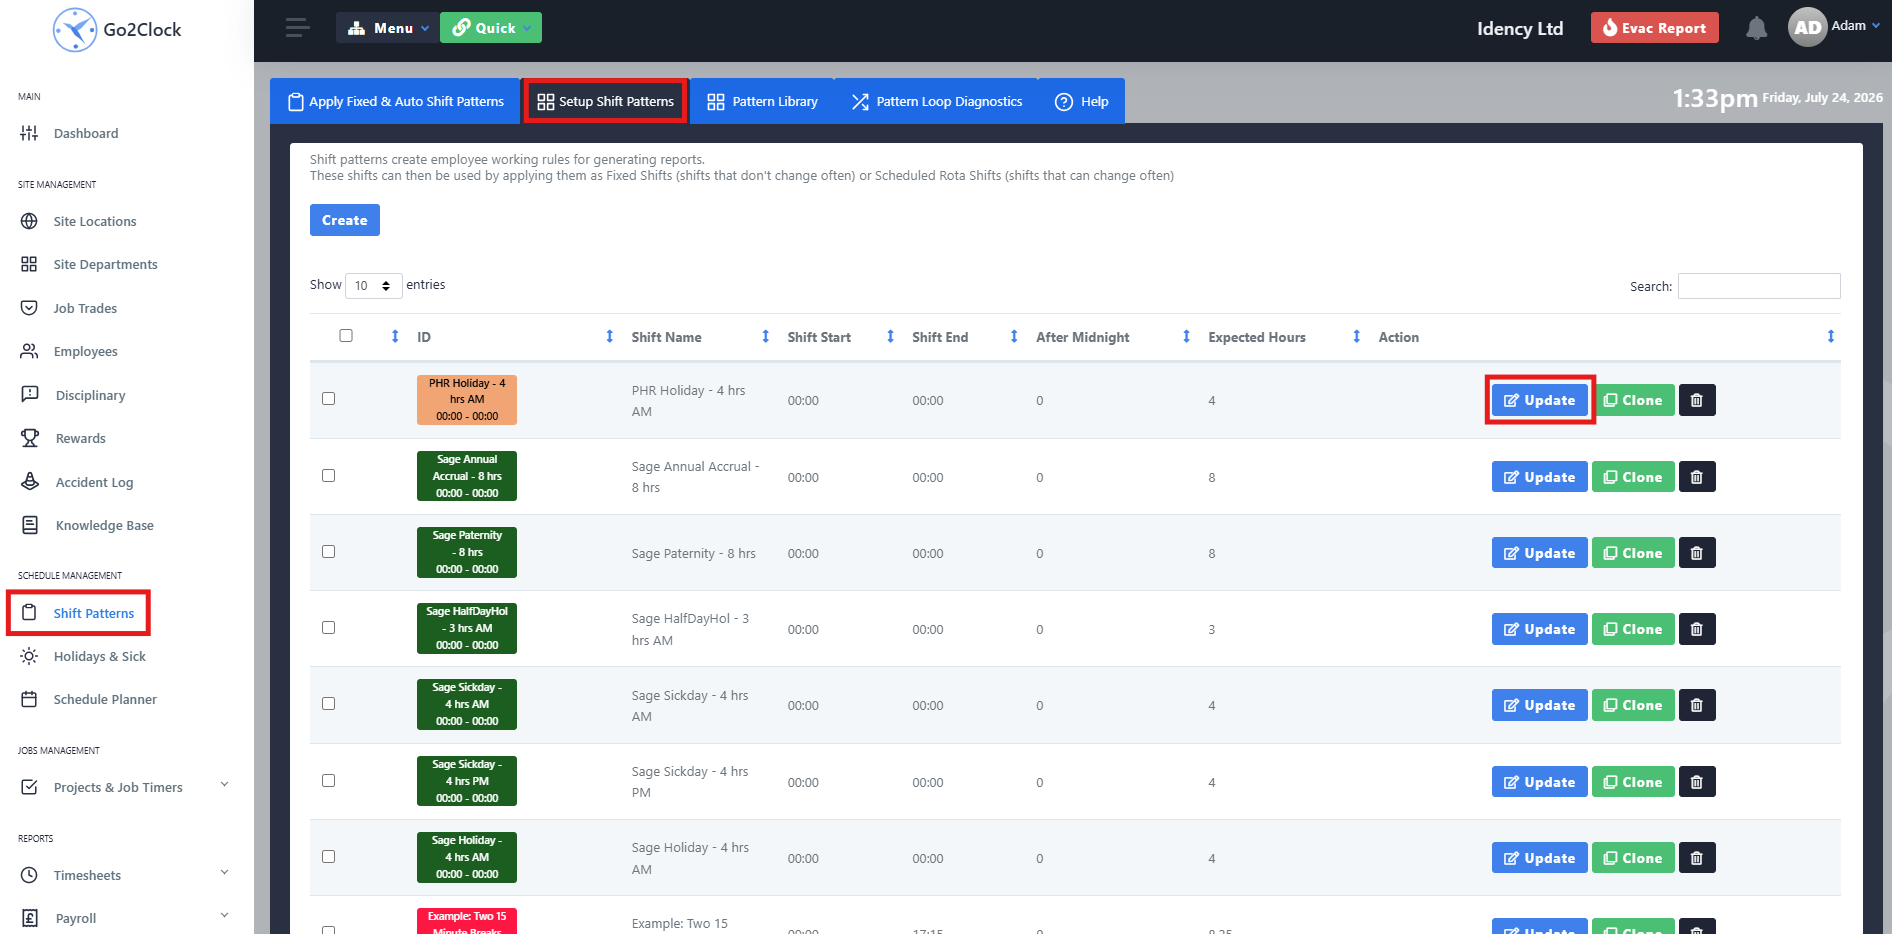
Étape 2 : Configurer les règles relatives aux congés de demi-journée et aux arrêts maladie
Ouvrez l'onglet « Règlements vacances et congés » dans le mode de travail. Insérez les heures de congés appropriées et activez la possibilité de choisir entre le congé pour maladie ou le congé de vacances. Spécifiez si le congé est rémunéré ou non.
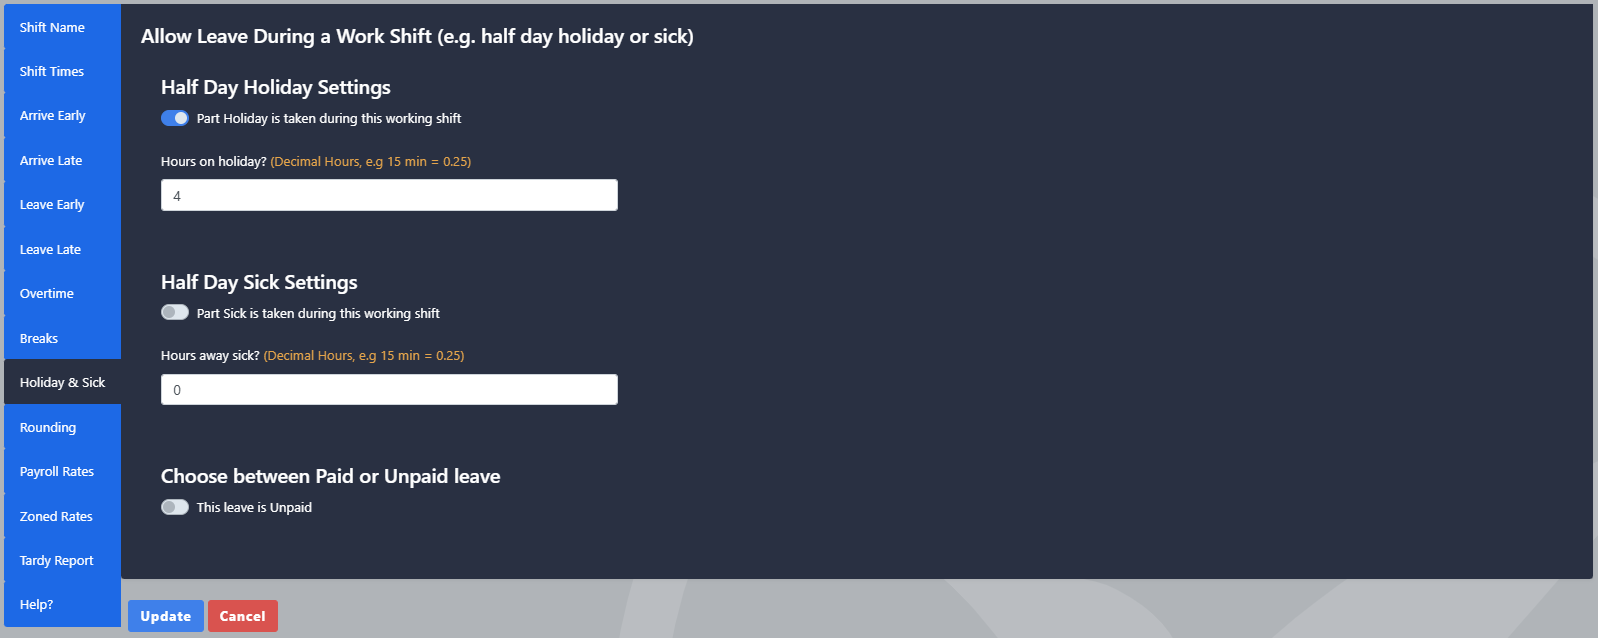
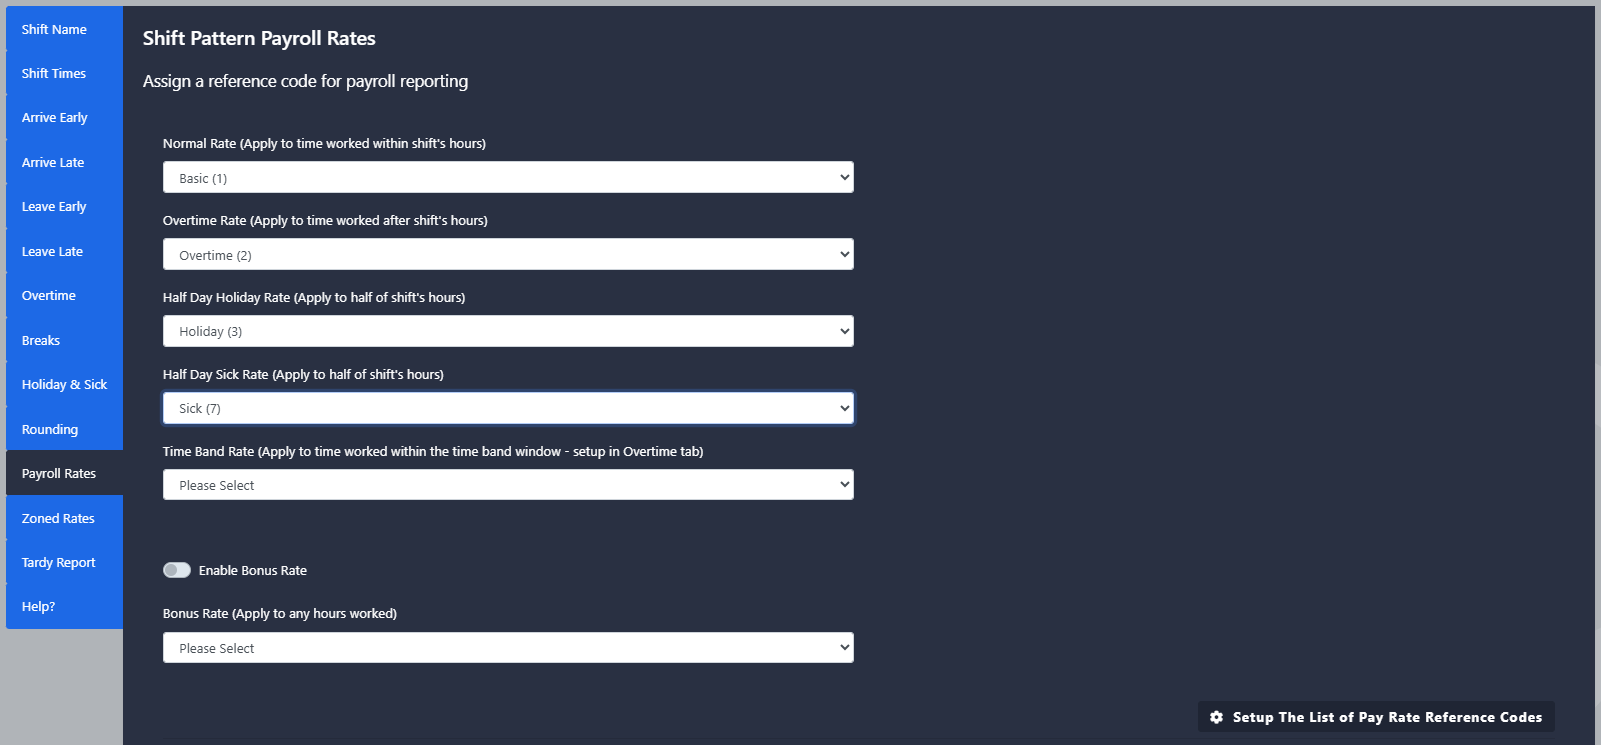
Étape 3 : Définir les taux de paie pour une demi-journée
Si vous utilisez Sage Paie, accédez à l'onglet des règles de taux de paie. Sélectionnez le taux de congé d'une demi-journée ou de maladie et appliquez le code de taux de paie correct.
Troubleshooting
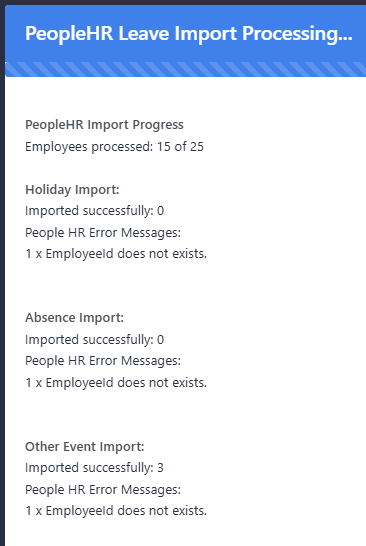
Message d'erreur : l'EmployeeId n'existe pas
Cette erreur se produit lorsque le salarié de PeopleHR n’est pas associé à quelqu’un dans Go2Clock. Pour y remédier, ajoutez l’ID PeopleHR à l’employé existant dans Go2Clock ou importez l’employé directement de PeopleHR.
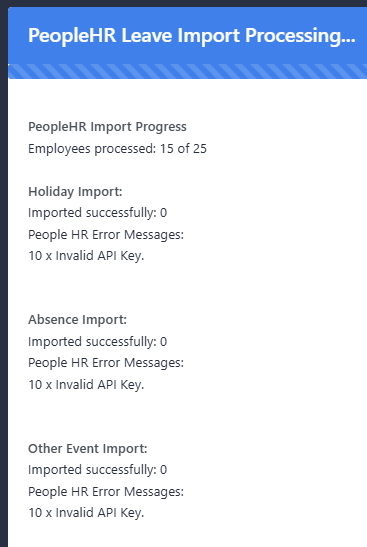
Message d'erreur : « API Key non valide »
Cette erreur survient lorsque le problème survient avec la clé API PeopleHR. Soit la clé API n’a pas été configurée avec les autorisations correctes, soit la clé API PeopleHR et le serveur sont configurés incorrectement dans Go2Clock.

Système de gestion des temps et des présences hébergé dans le cloud Go2Clock

















 English (UK)
  English
  English (Canada)
  Français du Canada
  Svenska
  Português
  Nederlands
  Italiano
  Français
  Español
  Deutsch