


































Go2Clock: Entendendo as regras dos padrões de trabalho
Os padrões de horário são a base do cálculo de horas, intervalos e pagamento pelo Go2Clock. Este guia explica cada configuração disponível na seção de padrões de horário, explicando o que cada uma faz e como isso afeta seus relatórios. Use o menu abaixo para acessar diretamente a seção que você precisa.
Este é um guia de referência que aborda todas as configurações de horário disponíveis no Go2Clock. Use o menu abaixo para encontrar a seção que você está procurando, em vez de ler de cima para baixo.
Regras básicas
Esta seção explica como cada padrão de horário é denominado e os horários de início e fim básicos que o definem.
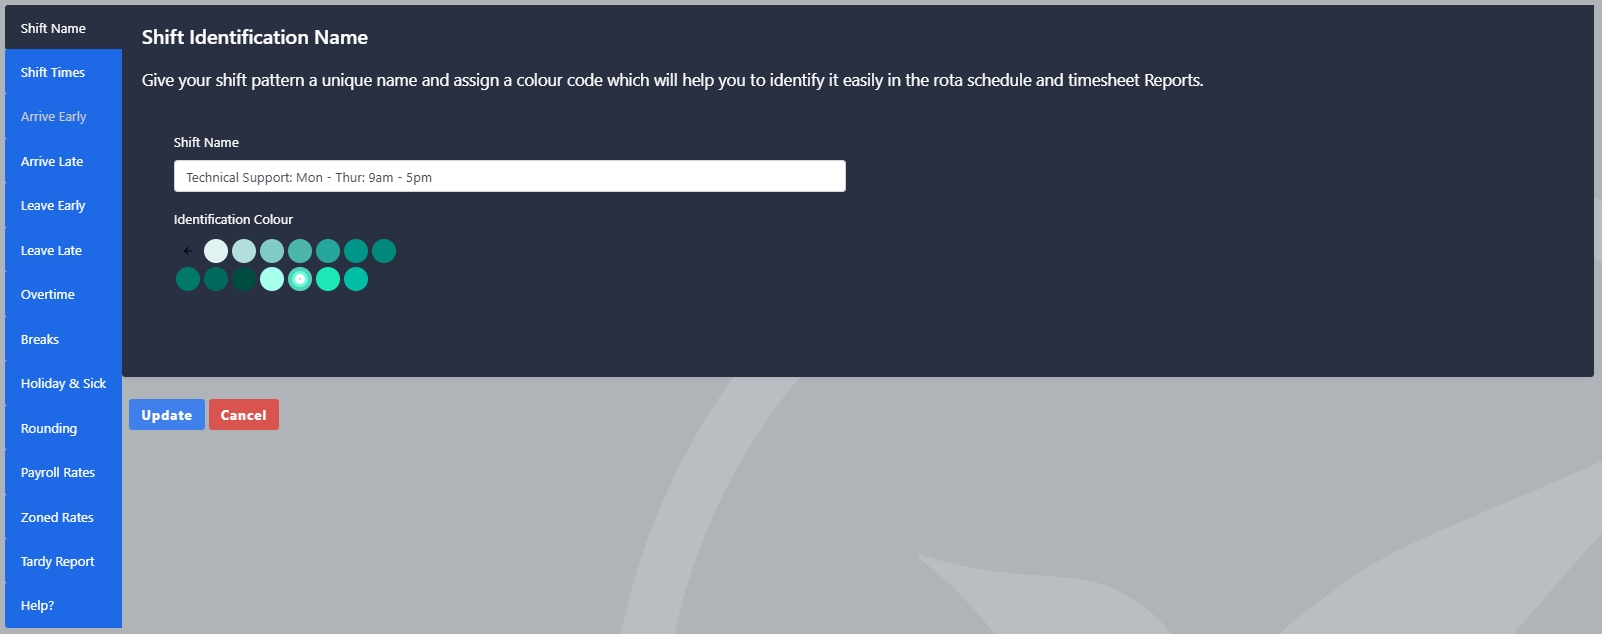
Nome da identificação da mudança
O nome do turno é usado para identificar o padrão de turno ao criar sua biblioteca de padrões. A maioria das empresas necessita de vários padrões de turno para acomodar diferentes horários de trabalho e tipos de turno. Uma convenção de nomeação clara e consistente facilita a administração e manutenção contínua.
Exemplo
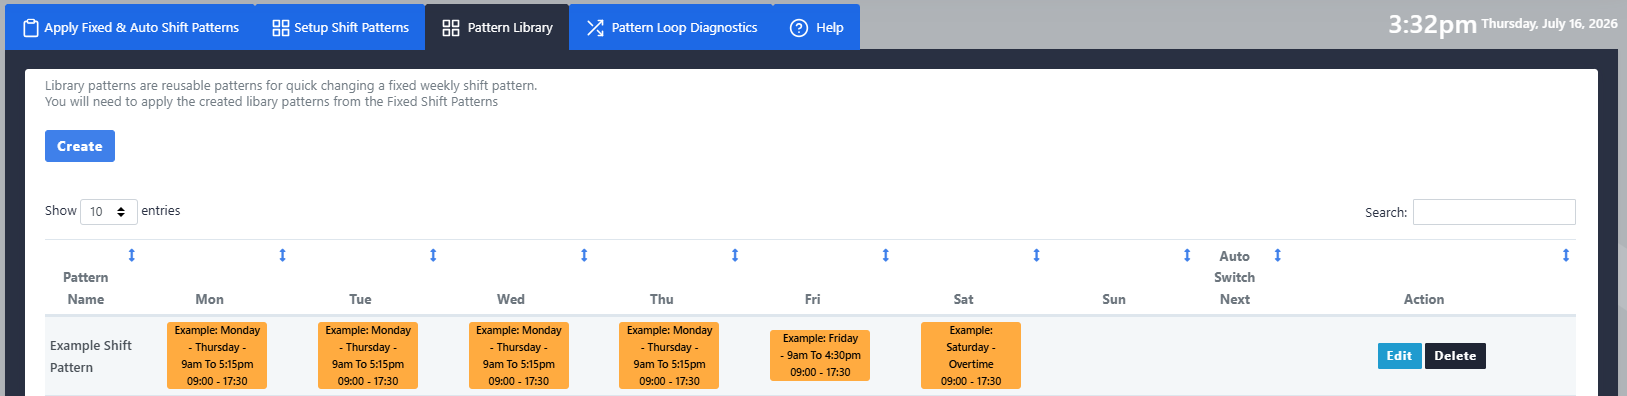
A imagem mostra uma biblioteca de padrões de deslocamento, onde cada padrão foi atribuído um nome claro e descritivo.
Horários de mudança de turno
Essas configurações determinam os horários de início e término esperados para a jornada de trabalho e influenciam o comportamento das regras de jornada aplicadas a ela. Adicione um horário de início e término e o Go2Clock calculará automaticamente as horas de trabalho esperadas para a jornada.
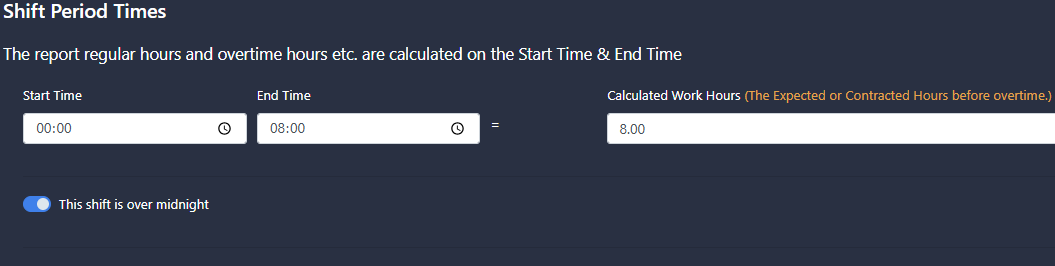
Se a mudança de horário for além da meia-noite, ative a opção "Night Shift" abaixo dos horários de início e fim. Isso garante que os relatórios calculem corretamente as horas trabalhadas, o tempo adicional e o total de comparecimento dos funcionários que trabalham em turnos noturnos.
Intervalo de tempo permitido para o trabalho
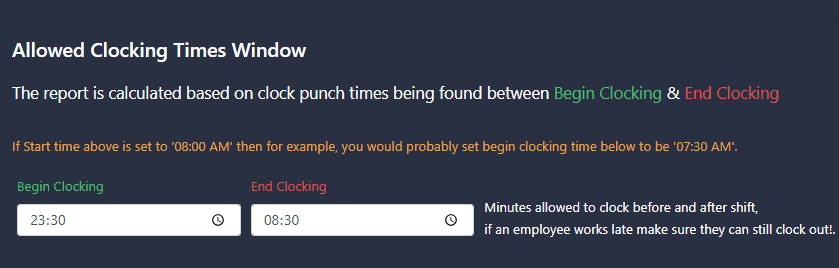
Este ajuste sinaliza certos relatórios no Go2Clock se um funcionário entrar ou sair durante esse período. Isso não impede que os funcionários façam o registro de entrada ou saída fora do período especificado nos dispositivos ou através do aplicativo móvel da web.
Geralmente recomendamos definir essa opção como a mais cedo e a mais tarde hora de início e fim de expediente, sendo que as empresas que não têm direito a horas extras normalmente adotam como padrão uma hora antes e uma hora após a hora de trabalho prevista.
Regras antes e depois
Esta seção explica como o Go2Clock trata os funcionários que chegam ao trabalho antes do início da jornada ou saem do trabalho após o fim dela.
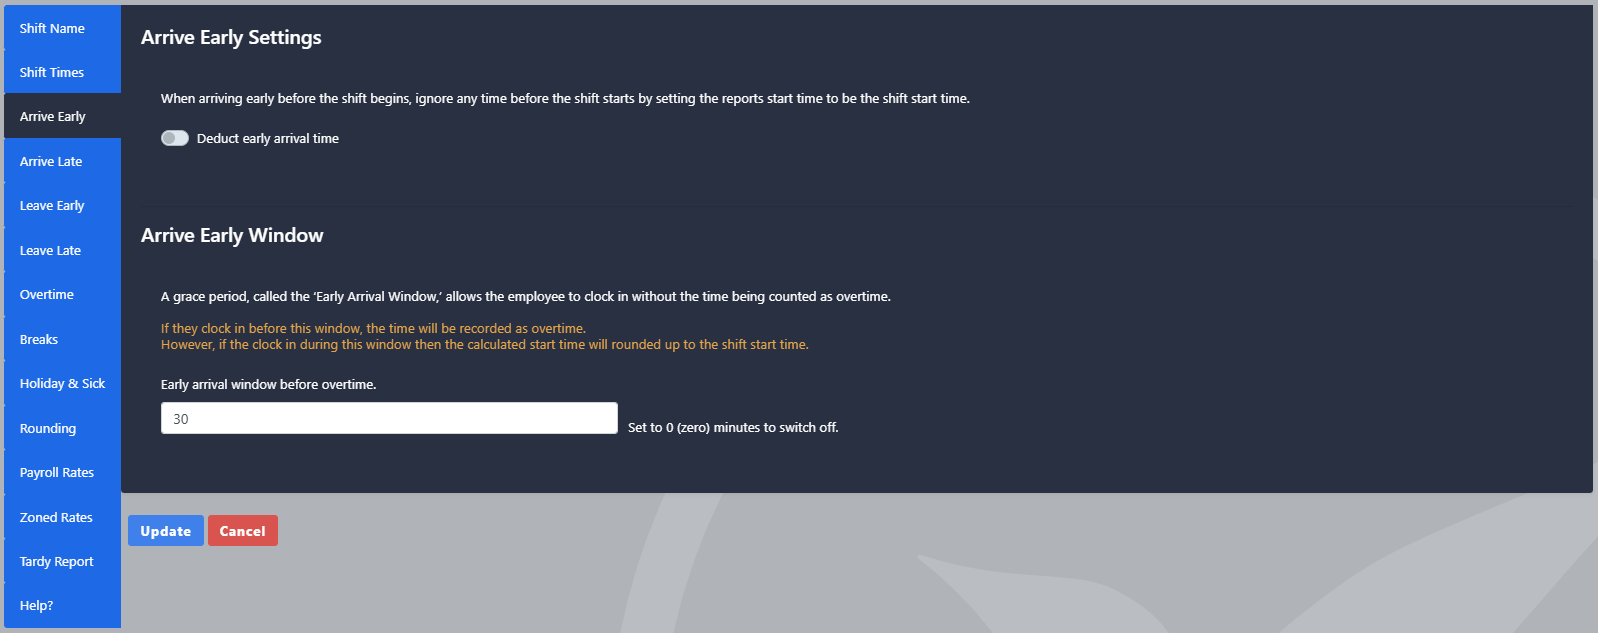
Deduzir o tempo de chegada antecipada
Quando a opção "Dedução de tempo de chegada antecipada" está ativada, qualquer tempo trabalhado antes do início oficial da jornada de trabalho é ignorado e excluído dos cálculos de folha de pagamento. Os tempos efetivamente registrados ainda serão exibidos no relatório; qualquer coisa anterior à jornada de trabalho será simplesmente removida do cálculo de tempo efetivamente trabalhado.
Exemplo
Nos dois cenários, o funcionário entra às 8h30 para uma jornada de trabalho às 9h00 e sai às 17h15. Quando a opção "Descontar tempo de chegada antecipada" está habilitada, o funcionário só recebe pagamento a partir das 9h00, portanto os 30 minutos trabalhados antes do início da jornada não são contabilizados. Quando a opção está desabilitada, o relatório inclui as horas totais de trabalho entre as 8h30 e as 17h15, conforme refletido nos totais.

Chegar com antecedência
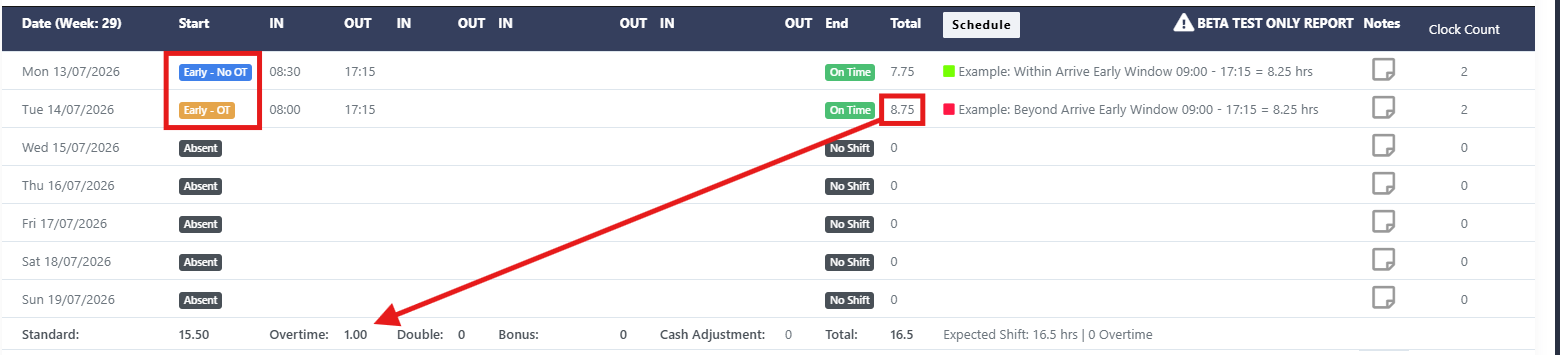
Esta configuração cria um período de transição antes do início da jornada. Qualquer hora trabalhada dentro desse período não será contabilizada como tempo padrão ou tempo extra. No entanto, se um funcionário entrar no trabalho antes do período de transição, o tempo adicional trabalhado fora desse período será contabilizado como tempo extra até o início da jornada.
Exemplo
Essa mudança tem um período de chegada antecipada de 45 minutos. Na segunda-feira, o funcionário chega ao trabalho 30 minutos antes do início da jornada, o que corresponde ao período de tolerância — suas horas ainda são calculadas a partir do horário de início previsto, às 9h. Na terça-feira, o funcionário chega um pouco mais cedo, 1 hora antes do horário previsto, excedendo o período de tolerância. Como o funcionário chegou fora do período estabelecido, o tempo adicional antes da jornada é reconhecido e contribui para o tempo adicional.
Deduzir minutos dos totais dos relatórios para os atrasados
Quando o botão ‘Os funcionários podem chegar atrasados nesta hora de trabalho’ está desativado, os funcionários que chegam ao trabalho após o horário de início da hora de trabalho são marcados como 'Tardos'. Isso aparece tanto nos relatórios de tardos quanto nos relatórios tradicionais. Quando ativado, eles são exibidos como 'Tardos autorizados' e não mais marcados como tardos no relatório de tardos.
O campo ‘Minutos para dedução automática quando chegar atrasado’ permite que uma dedução adicional seja aplicada pela demora, além do tempo já perdido pela chegada tardia. Não é possível configurar um período de tolerância para essa dedução; ela se aplica a todos os passageiros que se atrasam, mesmo que seja apenas um minuto.
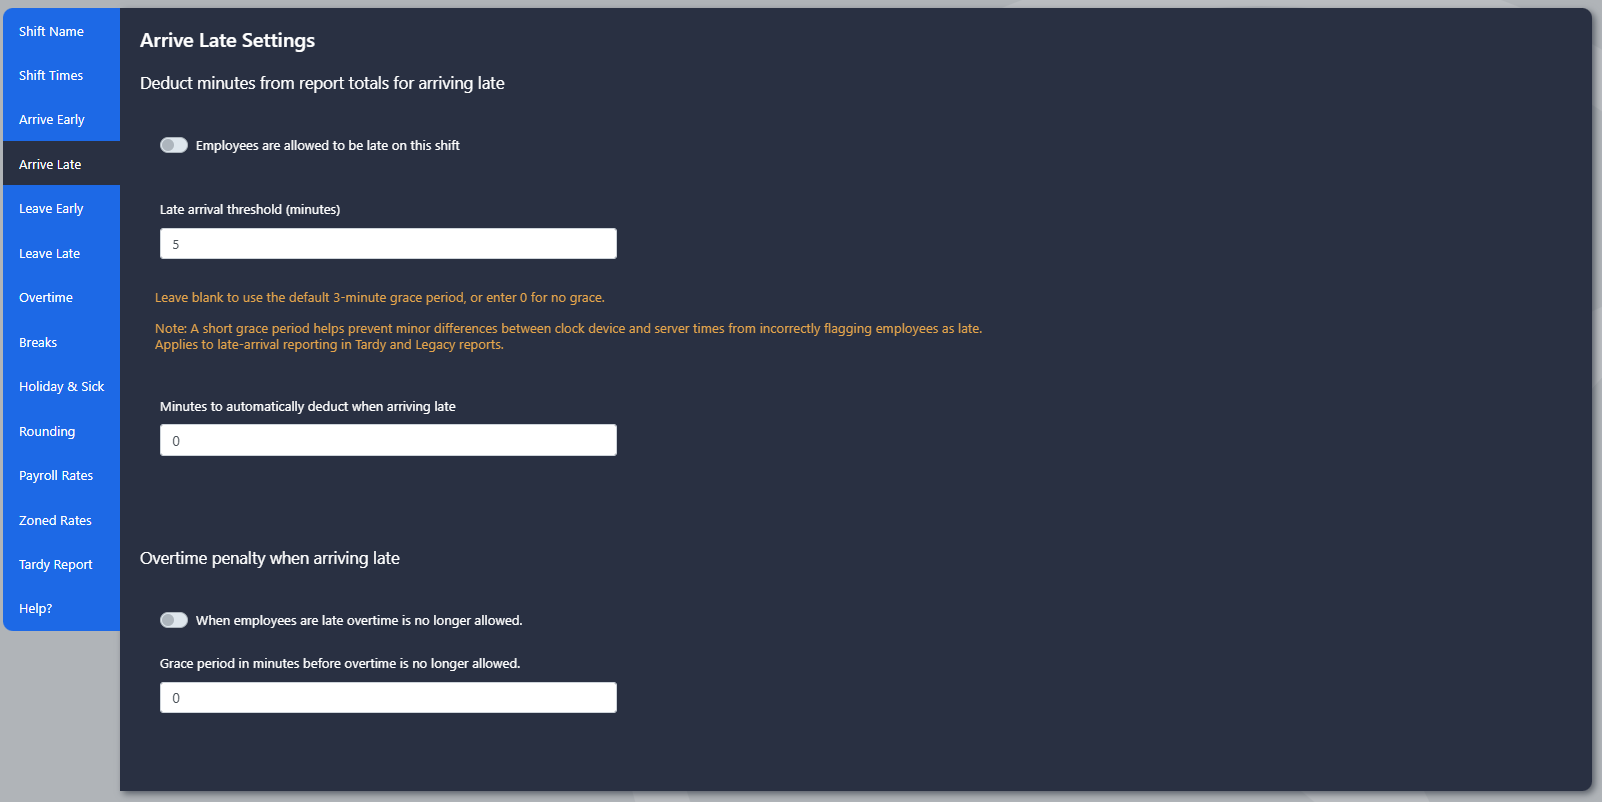
Se você precisar que os funcionários sejam marcados como atrasados sem dedução de tempo adicional, deixe a opção desabilitada e insira 0 minutos no campo de dedução.
Exemplo
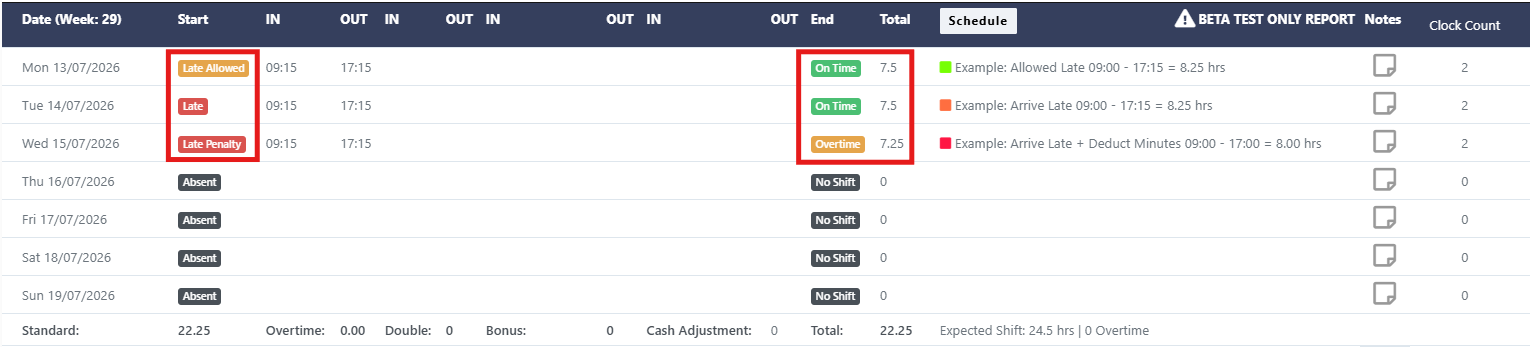
Em cada cenário, o funcionário chega ao trabalho 15 minutos atrasado. Na segunda-feira, a rotina é configurada para permitir atrasos, de modo que o funcionário seja marcado como “Acesso tardio” e suas horas sejam calculadas a partir das 9h15. Na terça-feira, o funcionário é marcado como “Acesso tardio”, mas nenhuma penalidade adicional é aplicada, de modo que suas horas ainda sejam calculadas a partir das 9h15. Na quarta-feira, o funcionário é marcado como “Acesso tardio” com uma penalidade adicional de 15 minutos configurada. Isso resulta no fato de o funcionário perder os 15 minutos originais por atraso, além da penalidade adicional de 15 minutos configurada.
Penalidade por tempo extra quando chega tarde
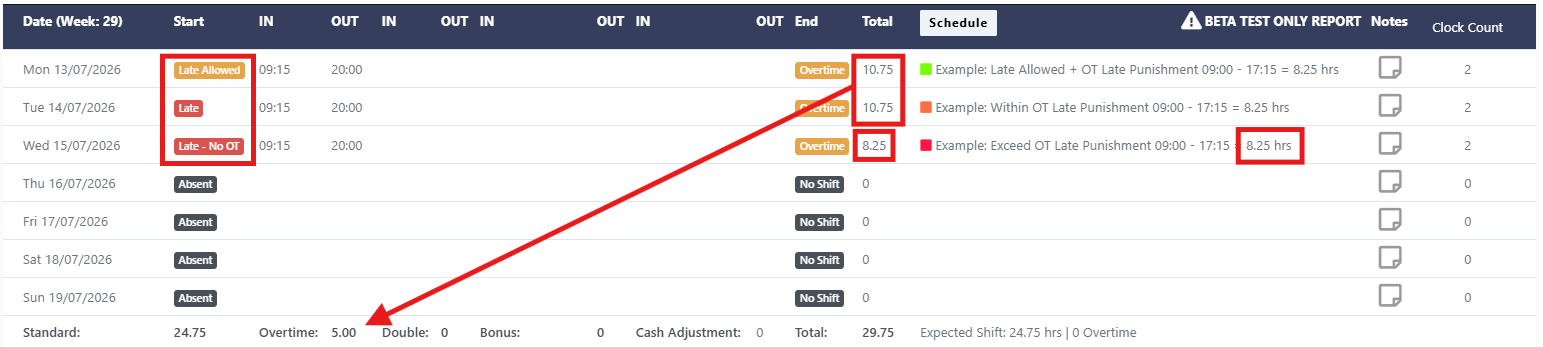
Quando a opção ‘Quando os funcionários chegarem tarde, o excesso de horas não será mais permitido’ estiver ativada, os funcionários que chegarem tarde não poderão acumular horas extras para essa jornada.
O período de graça para horas extras permite que os funcionários que chegarem dentro de um período específico continuem elegíveis para horas extras. Este período de graça só funciona se os funcionários estiverem marcados como tardios e a opção de suspensão das horas extras não estiver ativada.
Exemplo
O primeiro cenário mostra um funcionário que tem permissão para chegar atrasado, permitindo que ele continue elegível para horas extras. O segundo cenário utiliza um período de tolerância de 30 minutos para horas extras, o que significa que os funcionários que chegarem dentro desse período ainda poderão acumular horas extras. No cenário final, o funcionário chega atrasado sem nenhum período de tolerância ou hora tardia permitida, tornando-o inelegível para horas extras; apenas seus horários de trabalho normais serão calculados.
Saia mais cedo antes do fim do turno de trabalho
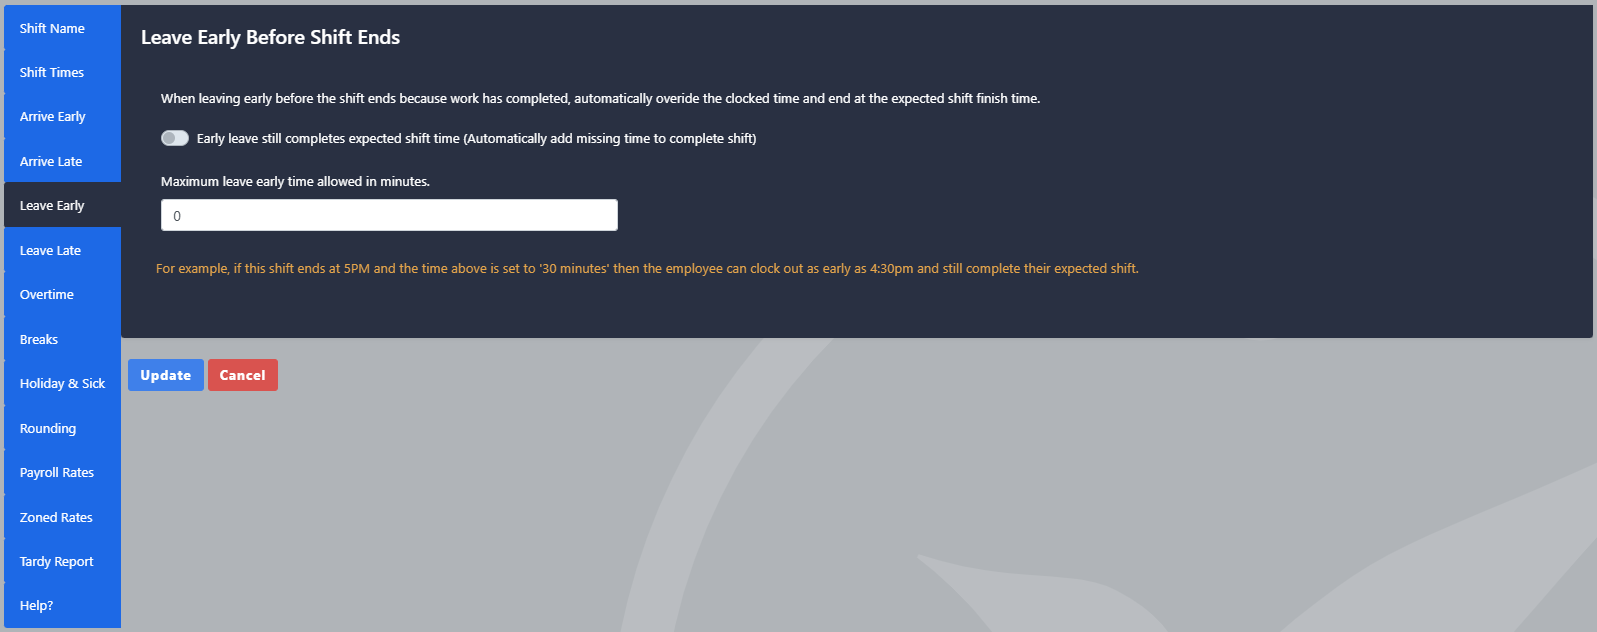
Esta configuração permite que os funcionários saiam do local dentro de um período específico.
antes do fim da sua jornada de trabalho, enquanto ainda recebia o resto
as suas horas de trabalho previstas em tempo integral.
Exemplo
No primeiro cenário, a mudança permite que os funcionários saiam 30 minutos antes do horário de término previsto, sem que isso afete o cumprimento das horas de trabalho previstas. Apesar de o funcionário sair mais cedo, suas horas são calculadas até o horário de término previsto da jornada. No segundo cenário, a regra está desabilitada. As horas totais do funcionário são calculadas apenas com base nos horários de entrada e saída, o que resulta em menos horas trabalhadas.

Saída tardia após o fim do turno
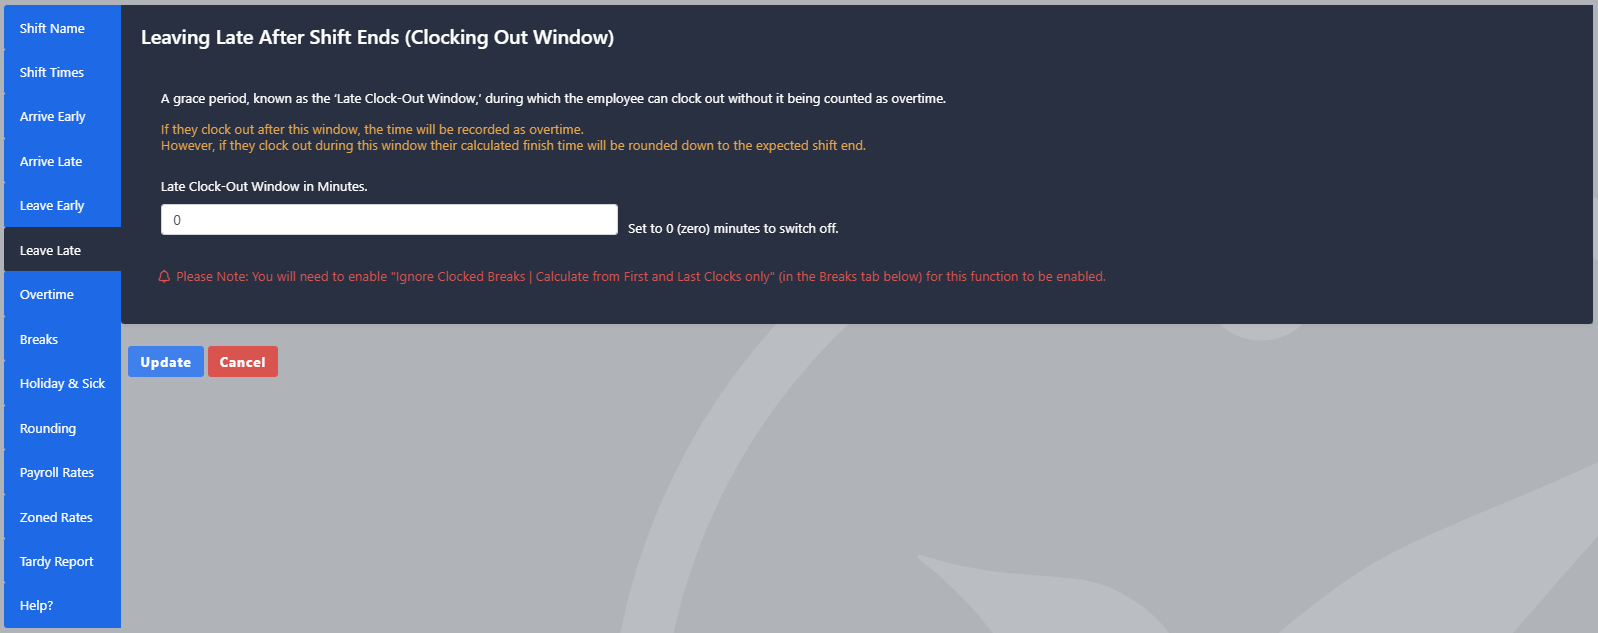
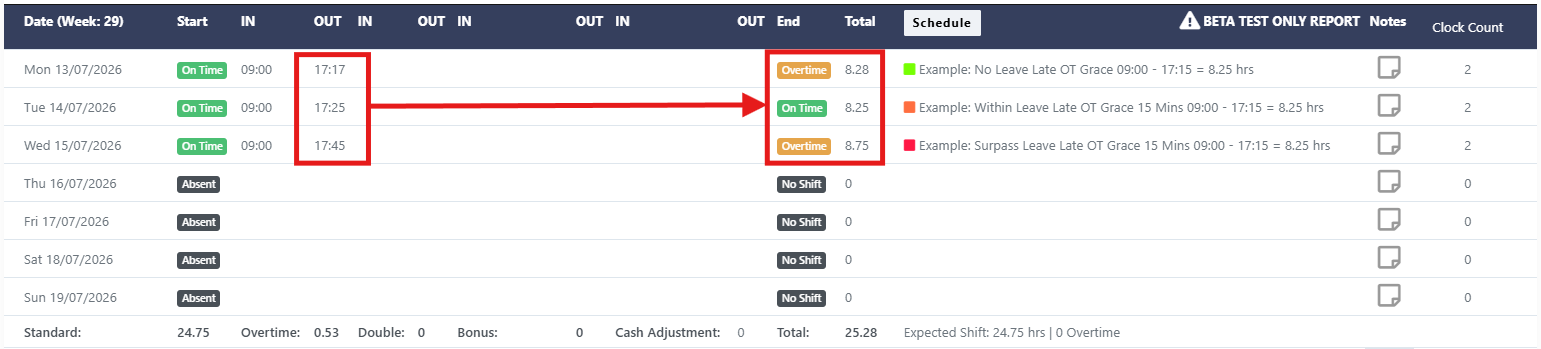
Esta configuração cria um período de tolerância após o fim de uma jornada de trabalho durante o qual não serão acumulados horas extras. Sem essa regra, os funcionários que terminam o trabalho alguns minutos atrasados todos os dias acumulariam horas extras.
Exemplo
No primeiro cenário, a janela de saída do horário de trabalho está definida em 0 minutos, portanto o funcionário acumula horas extras pelos 2 minutos trabalhados após o horário de término previsto de 17h15. No segundo cenário, foi configurada uma pausa de 15 minutos, portanto os 2 minutos adicionais do funcionário não são considerados e não contribuem para o cálculo das horas extras. No último cenário, o funcionário trabalha além do período de 15 minutos de pausa, portanto o tempo trabalhado após esse período é reconhecido e contribui para o cálculo das horas extras.
Regras para o tempo extra
Esta seção aborda como o tempo extra é calculado, desde a sua desativação total até as taxas por hora e as regras de tempo extra com horas qualificadas.
Configurações para o tempo extra
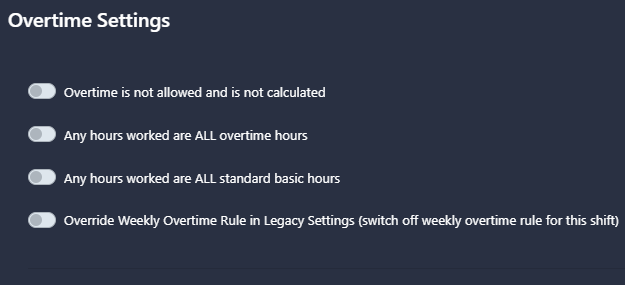
O Go2Clock oferece quatro maneiras de controlar como a sobrecarga de trabalho é calculada para uma jornada de trabalho. Desde a desativação total, até o tratamento de todas as horas como sobrecarga de trabalho, passando pela superação da regra semanal de sobrecarga de trabalho para essa jornada específica. Cada opção é explicada abaixo.
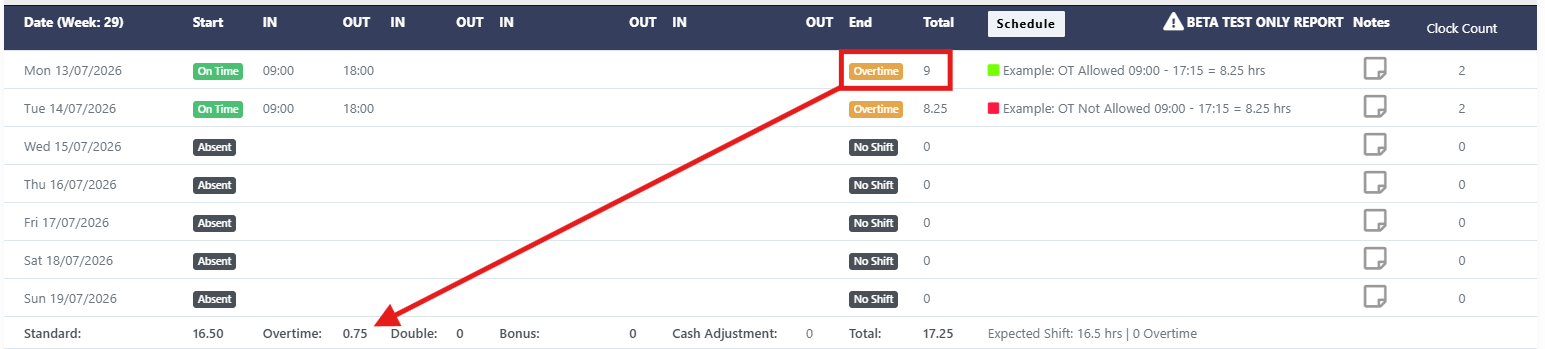
Não são registradas horas extras, independentemente do número de horas trabalhadas. Os funcionários receberão apenas as horas de trabalho padrão.
Exemplo
No primeiro cenário, a sobrecarga de trabalho é permitida, de modo que todas as horas trabalhadas além do horário padrão do funcionário contribuem para a sobrecarga de trabalho. No segundo cenário, a sobrecarga de trabalho é desativada, o que significa que o funcionário só recebe créditos pelas horas trabalhadas no horário padrão, independentemente do tempo adicional trabalhado.
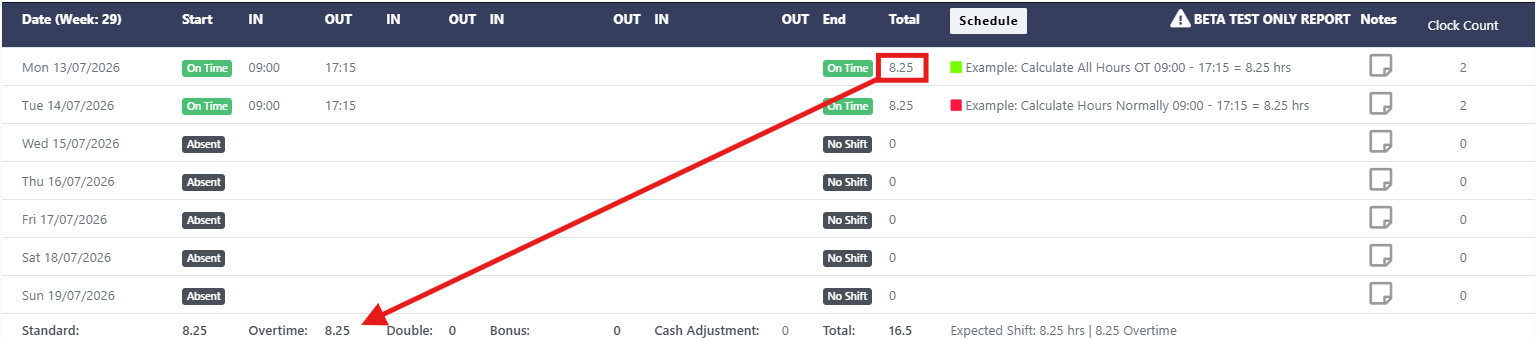
Cada hora trabalhada na jornada é considerada como hora extra. Isso é comumente utilizado para jornadas extras realizadas durante o fim de semana.
Exemplo
Em ambos os cenários, o funcionário trabalha o mesmo número de horas. No primeiro cenário, a rotina de trabalho é configurada de forma a que todas as horas trabalhadas sejam contabilizadas como horas extras e registradas no campo Horas extras. No segundo cenário, as horas são tratadas como horas de trabalho normais.
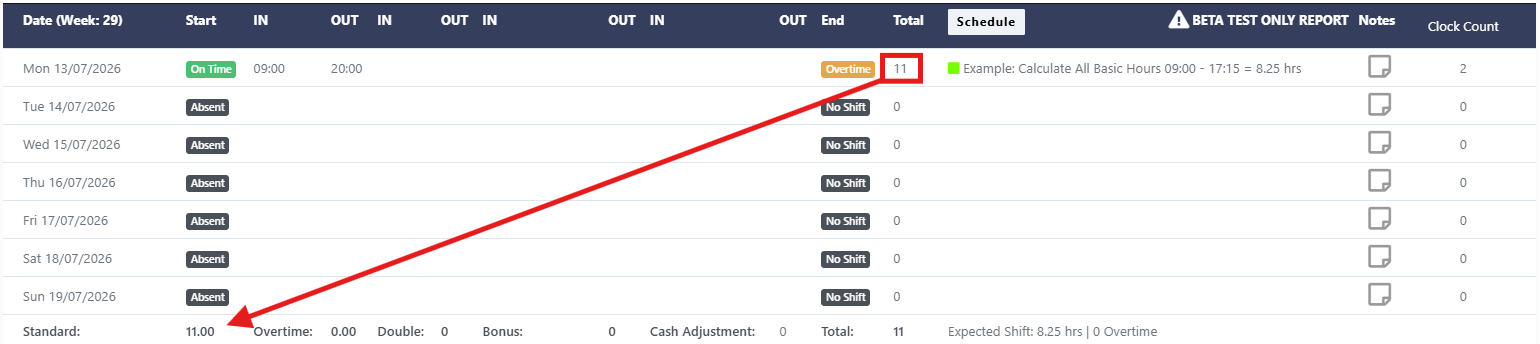
Todas as horas trabalhadas são convertidas em horas padrão, mesmo que os funcionários trabalhem além do horário final da sua jornada de trabalho.
Exemplo
O funcionário trabalhou 11 horas, excedendo o período de trabalho previsto. Com essa configuração ativada, todas as 11 horas foram registradas como Horas Básicas Padrão e nenhum dos períodos adicionais foi classificado como horas extras.
Se você estiver usando a Regra de Horas Extraordinárias Semanais no Relatório Legacy para calcular as horas extras cumulativas, essa opção permite que as horas extras sejam acumuladas nesse turno. Isso aplica-se mesmo que o funcionário ainda não tenha atingido as horas semanais previstas.
Normalmente, a regra de horas extras semanais exige que os funcionários trabalhem as horas contratadas padrão antes que as horas adicionais comecem a contribuir para o pagamento de horas extras. Ativando essa opção de override, essa exigência é ignorada e as horas extras acumulam-se diariamente, de acordo com as regras de plantão configuradas.
Exemplo
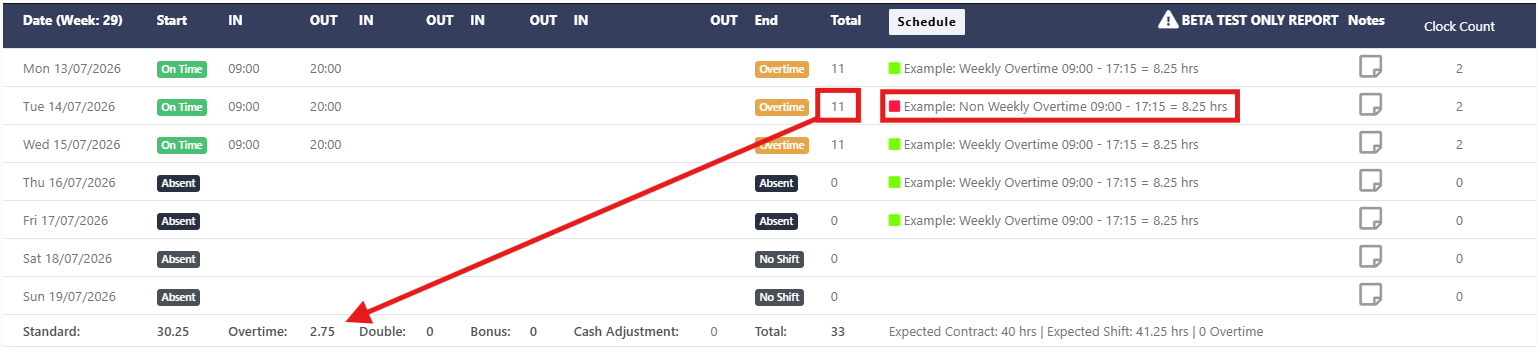
Quando a regra de horas extras semanais for ativada, espera-se que o funcionário cumpra as 40 horas contratadas estabelecidas. No entanto, ele está trabalhando em um turno de terça-feira que não utiliza a regra de horas extras semanais. Isso significa que o funcionário qualificou-se para 2,75 horas de horas extras na jornada de terça-feira.
Configurações de Banda de Tempo
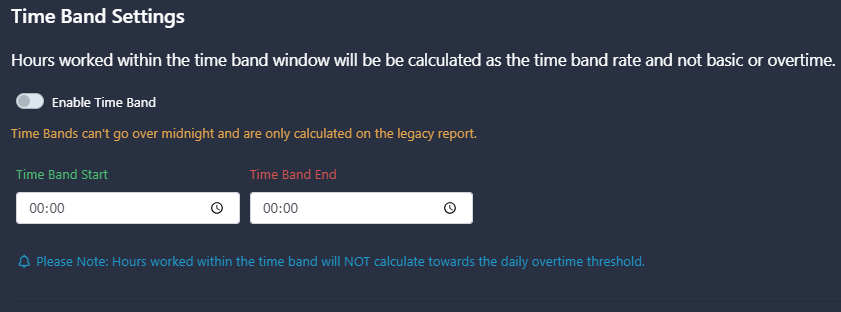
As horas trabalhadas dentro da faixa horária são calculadas com base na taxa da faixa horária, em vez da taxa básica ou de horas extras. Isso ignora as regras de plantão existentes e aplica a taxa da faixa horária a todas as horas dentro desse período.
Os intervalos horários não podem exceder a meia-noite e são calculados apenas no Relatório Legacy. As horas trabalhadas dentro do intervalo horário NÃO serão consideradas para o limite diário de horas extras.
Exemplo
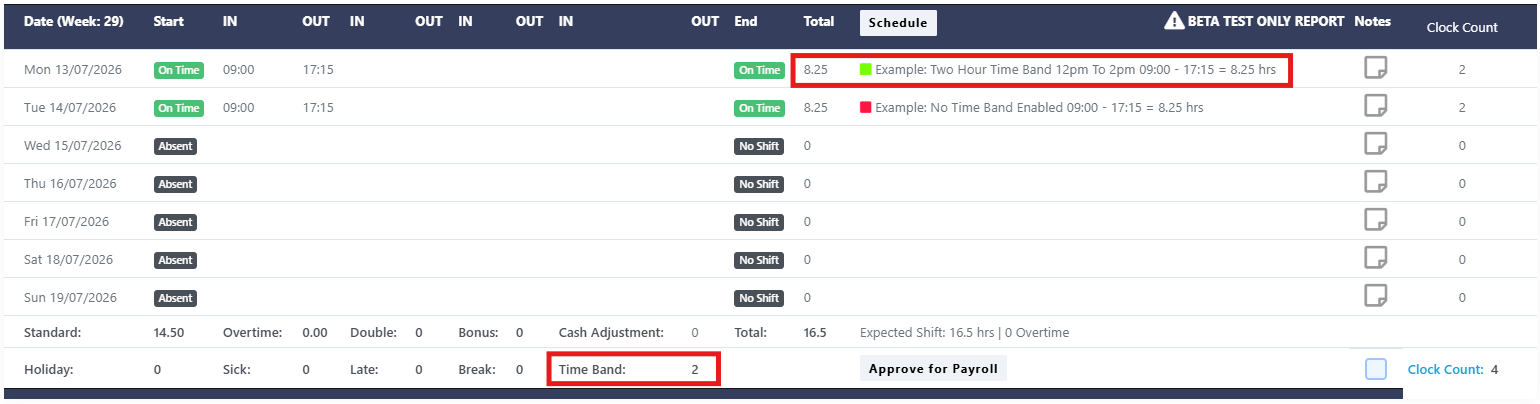
Essa mudança inclui um intervalo de tempo de 2 horas. Quaisquer horas trabalhadas durante esse período contribuem para o total do intervalo de tempo, em vez de serem registradas como horas de trabalho normais.
Regra de horas extras do Week End Premium
A regra de horas extras do programa Week End Premium permite que os funcionários recebam horas extras premium após terem cumprido um número específico de horas dentro de um período de qualificação definido.
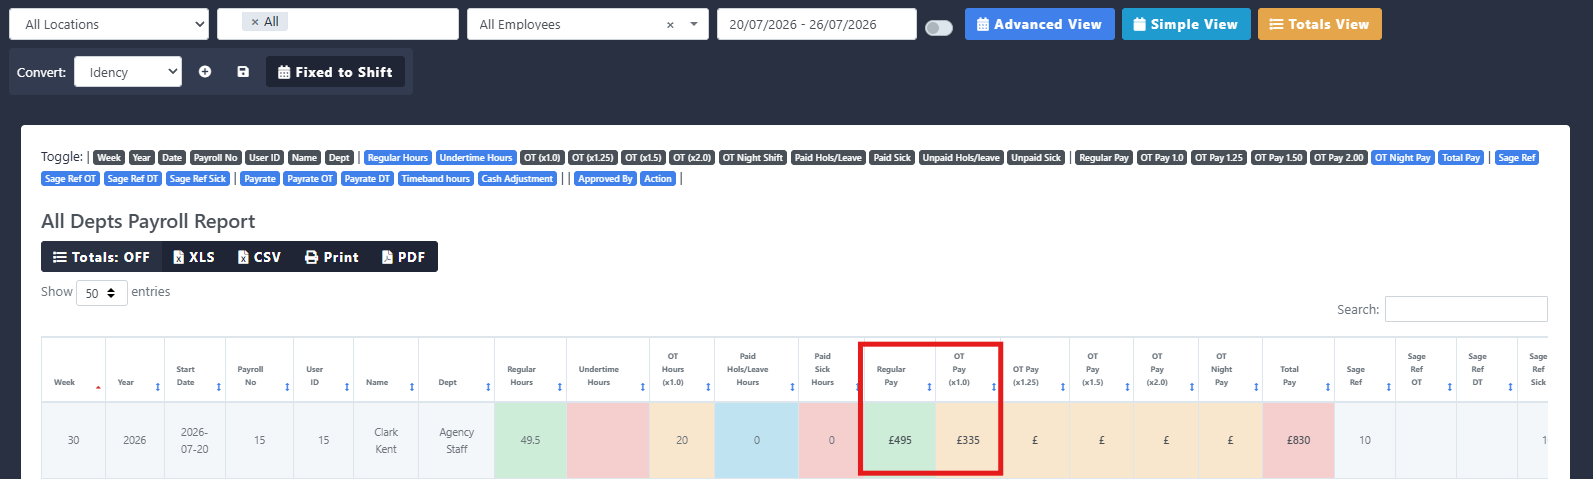
Esta regra é calculada apenas nos relatórios v1 e v2_week_end_premium_overtime na seção Relatórios Legacy. Após a aprovação de um funcionário, o tempo extra calculado em função da remuneração é exportado para o Payroll de Funcionários com Base Fixa como valor monetário.
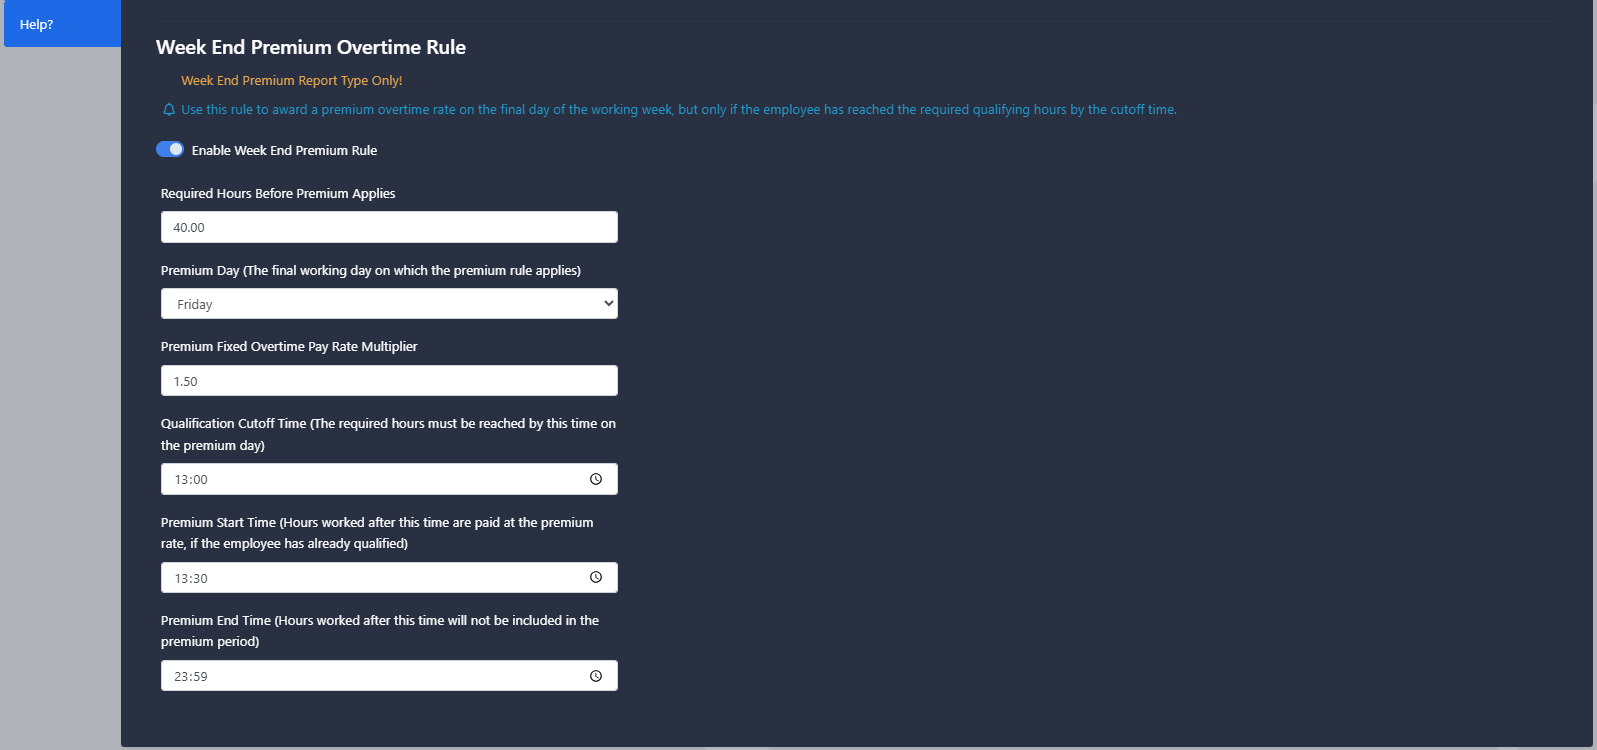
Determina quantas horas um funcionário deve trabalhar antes de se qualificar para horas extras premium. Se um funcionário não atingir esse número de horas exigido, ele não terá direito à taxa de horas extras premium e todas as horas serão calculadas como horas regulares.
Determina o dia a partir do qual a remuneração por horas extras pode começar a ser recebida, desde que o funcionário tenha cumprido o número de horas de trabalho exigido e a Limite de Horas de Trabalho Qualificadas tiver sido ultrapassada.
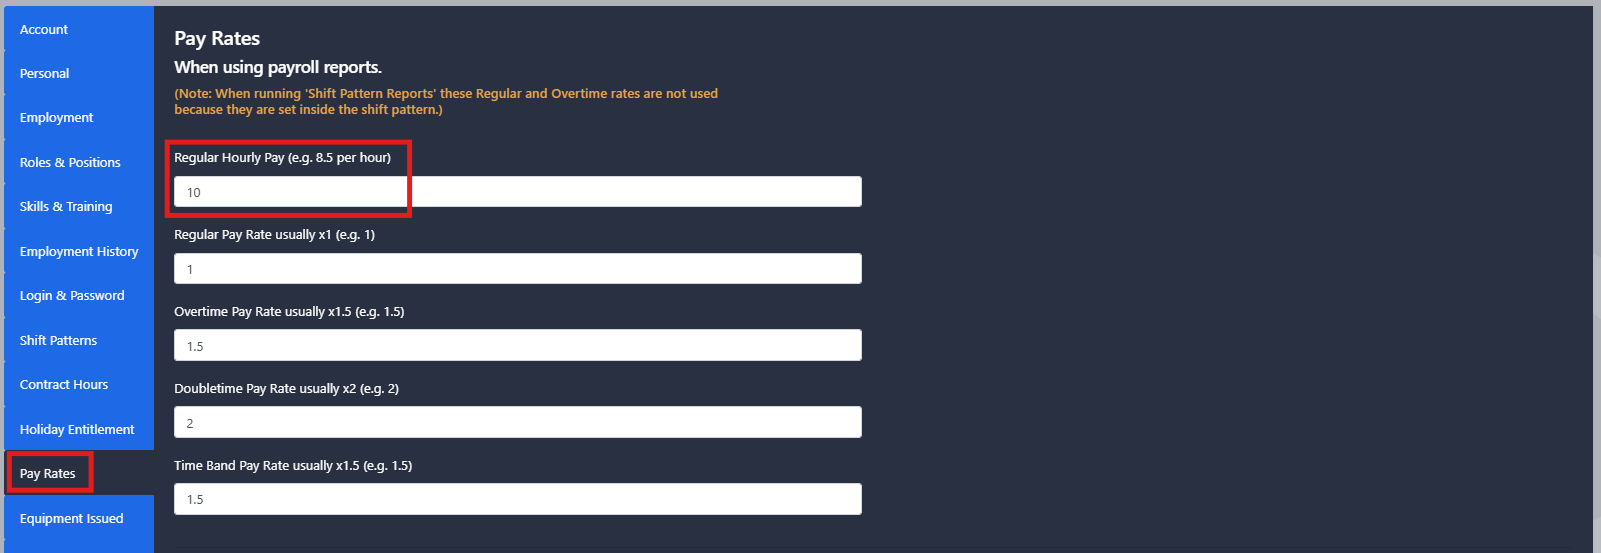
Determina a taxa de pagamento de horas extras por hora, tomando como base o salário horário normal do funcionário. O Go2Clock calcula isso tomando o salário horário normal do funcionário, definido nas configurações de Tarifas de Salário do funcionário, e multiplicando-o pelo multiplicador definido. A taxa horária resultante é então aplicada a quaisquer horas extras qualificadas de trabalho em excesso.
Define a hora do dia, no Plano Premium Day, em que os funcionários podem começar a acumular horas extras premium. As horas trabalhadas até o horário limite são contabilizadas no total de horas de trabalho do funcionário, mesmo que o limite de horas exigido tenha sido atingido. Se o funcionário tiver cumprido ou excedido o limite de horas exigido até o horário limite, as horas extras premium começarão a ser acumuladas a partir do ponto definido. Caso contrário, as horas extras premium só serão desbloqueadas quando o funcionário tiver cumprido as horas exigidas.
O Tempo de início do Premium Define quando o tempo extra premium fica disponível para o Dia Premium ou dias seguintes de trabalho. Isso permite que o tempo extra premium seja acumulado até o início do próximo pagamento semanal. O Tempo de término do Premium Define quando o período de tempo extra premium termina. Normalmente, esse tempo é configurado para 23:59 para garantir que todo o tempo extra trabalhado durante o dia seja incluído.
Para variações na Taxa de Salário Múltipla de Horas Extratrabalhadoras Premium durante a semana, você precisará configurar padrões de turnos separados com a taxa ajustada. A Hora de Início Premium e a Hora de Fim Premium também devem ser configuradas para os dias em que o padrão for aplicado. Sábado e domingo, por exemplo, podem ter períodos de tempo diferentes. Todos os demais campos devem permanecer os mesmos em cada padrão de turno.
Exemplo
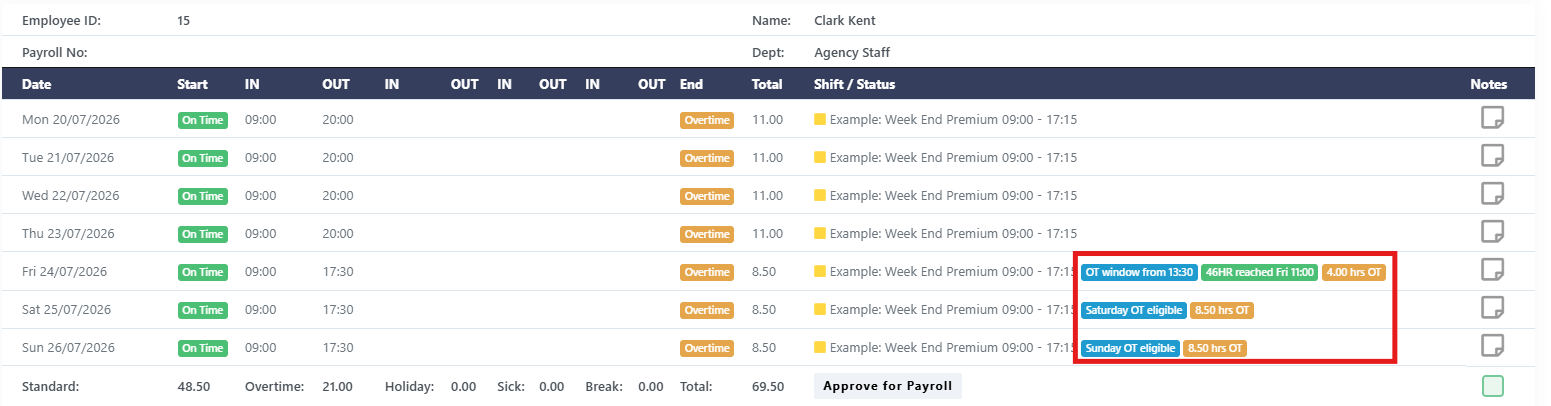
O funcionário completou as horas qualificatórias exigidas antes do horário limite de qualificação definido. Como o funcionário cumpriu o limite exigido dentro do período permitido, quaisquer horas trabalhadas durante o período de início e término de trabalho premium configurados são elegíveis para a taxa de horas extras premium. Uma vez aprovadas, essas horas extras premium são exportadas para o sistema de folha de pagamento de funcionários com base fixa como valor monetário.
Exemplo
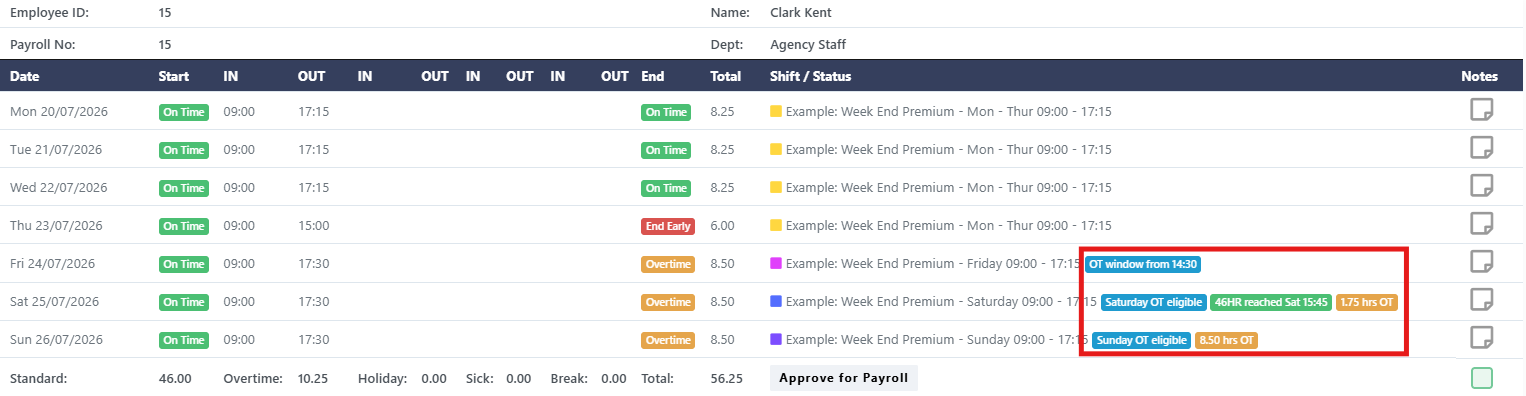
O funcionário não completou as horas qualificatórias necessárias antes do Fim do Período de Qualificação. Como o funcionário não atingiu o limite exigido durante o período de qualificação, as horas trabalhadas durante o período de prêmio continuam a ser tratadas como horas padrão. Uma vez atingido o número de horas exigido, isso muda. Uma vez completadas as horas qualificatórias, quaisquer horas trabalhadas adicionais elegíveis durante o período de prêmio podem então ser calculadas com base na taxa de horas extras do período de prêmio.
Quebra as regras
Esta seção aborda como as pausas são deduzidas das horas trabalhadas, como as pausas cronometradas são tratadas nos relatórios e como o direito a pausas remuneradas é aplicado.
Configurações de pausa obrigatórias
Pode haver até três pausas automáticas não remuneradas configuradas para cada turno, além de dois botões que controlam como e quando elas são deduzidas das horas trabalhadas.
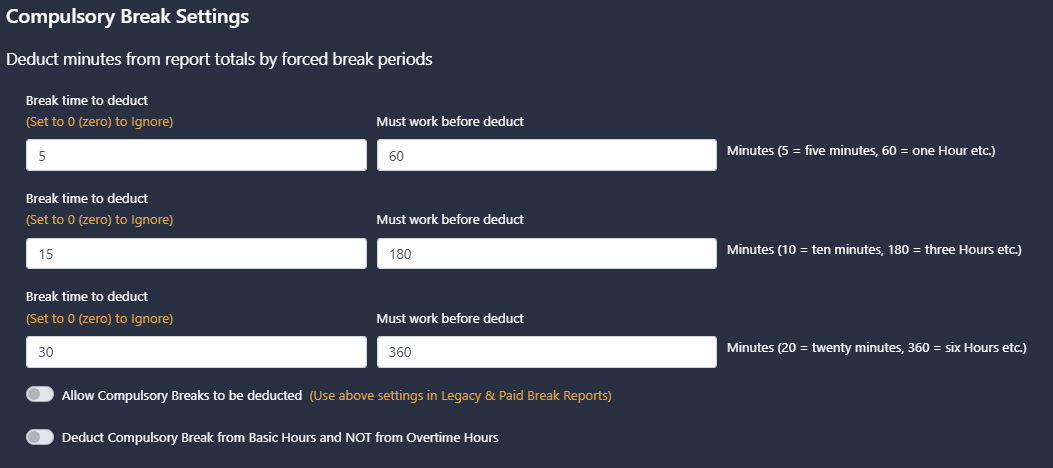
O campo à esquerda define a duração da pausa em minutos, enquanto o campo à direita define quantas minutos devem ter sido cumpridas antes que a pausa se torne aplicável.
Esses períodos de descanso não são cumulativos. Uma vez que um funcionário atinja um limite de período de descanso mais alto, ele substitui o período de descanso mais baixo, em vez de ser adicionado a ele. Os períodos de descanso não utilizados devem ser definidos como 0.
Exemplo
O primeiro cenário mostra uma mudança sem dedução automática de horas trabalhadas, de modo que o funcionário recebe todos os créditos correspondentes às horas trabalhadas. No segundo cenário, uma pausa não remunerada de 15 minutos é deduzida assim que o funcionário tiver trabalhado tempo suficiente para atingir o limite configurado. Os cenários três e quatro mostram vários limites de pausa. À medida que o funcionário trabalha mais, ele qualifica-se para uma dedução maior de pausa, sendo cada limite mais alto que substitui a dedução anterior, em vez de ser adicionado a ela.
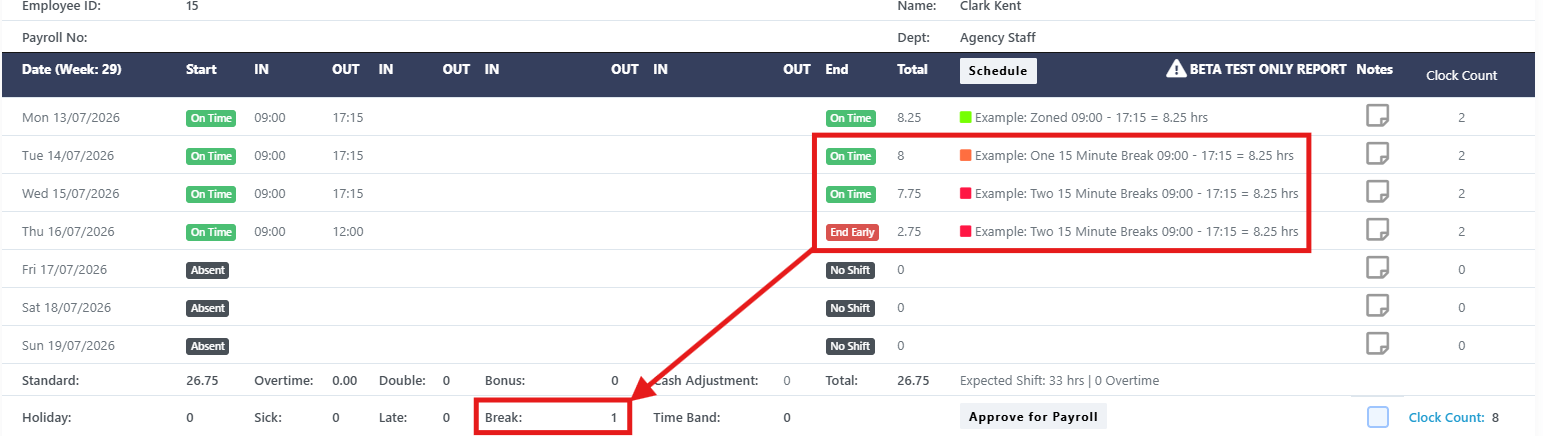
Quando ativada, as pausas não remuneradas são deduzidas automaticamente das horas trabalhadas. Se desativada, não ocorrerá nenhuma dedução automática de pausas. Isso aplica-se apenas aos relatórios de Pausas Legais e Pagas.
Quando ativada, as pausas não remuneradas são deduzidas apenas das horas normais de trabalho. Quando desativada, a regra deduz a pausa das horas extras.
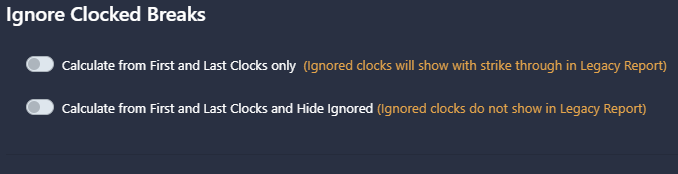
Ignorar os intervalos de tempo marcados
Quando ativada, apenas o horário inicial e o horário final do funcionário são utilizados para calcular as horas trabalhadas. Essa opção é comumente utilizada quando os funcionários saem do trabalho para fins de evacuação em caso de incêndio ou monitoramento, mas a folha de pagamento exige uma dedução fixa de folga não remunerada independentemente do tempo efetivamente gasto em folga.
Se as deduções automáticas de intervalos forem ativadas, geralmente recomendamos habilitá-la para evitar que o tempo de intervalo seja deduzido duas vezes.
As faixas de tempo de pausa permanecem visíveis no relatório, sendo apresentadas com uma marca de ponto para indicar que foram ignoradas no cálculo do total de horas trabalhadas.
Os registros de horário de saída e entrada são completamente ocultados do relatório, de modo que apenas o horário de entrada e saída inicial do funcionário são exibidos e utilizados para os cálculos do relatório.

Exemplo
Em todos os três cenários, o funcionário sai do trabalho para uma pausa entre as 12h00 e as 12h30. No primeiro cenário, a opção Ignore Pausas Concluídas está desativada, portanto a pausa de 30 minutos é deduzida das horas trabalhadas do funcionário. No segundo cenário, a opção Calcular apenas a partir do primeiro e do último relógio é ativada, de modo que os registros de pausa permaneçam visíveis com uma marca de seleção. No último cenário, a opção Calcular apenas a partir do primeiro e do último relógio e ocultar as pausas ignoradas é ativada, de modo que apenas os primeiros registros de entrada e os últimos registros de saída do funcionário sejam exibidos.
Configurações de pausa pagas
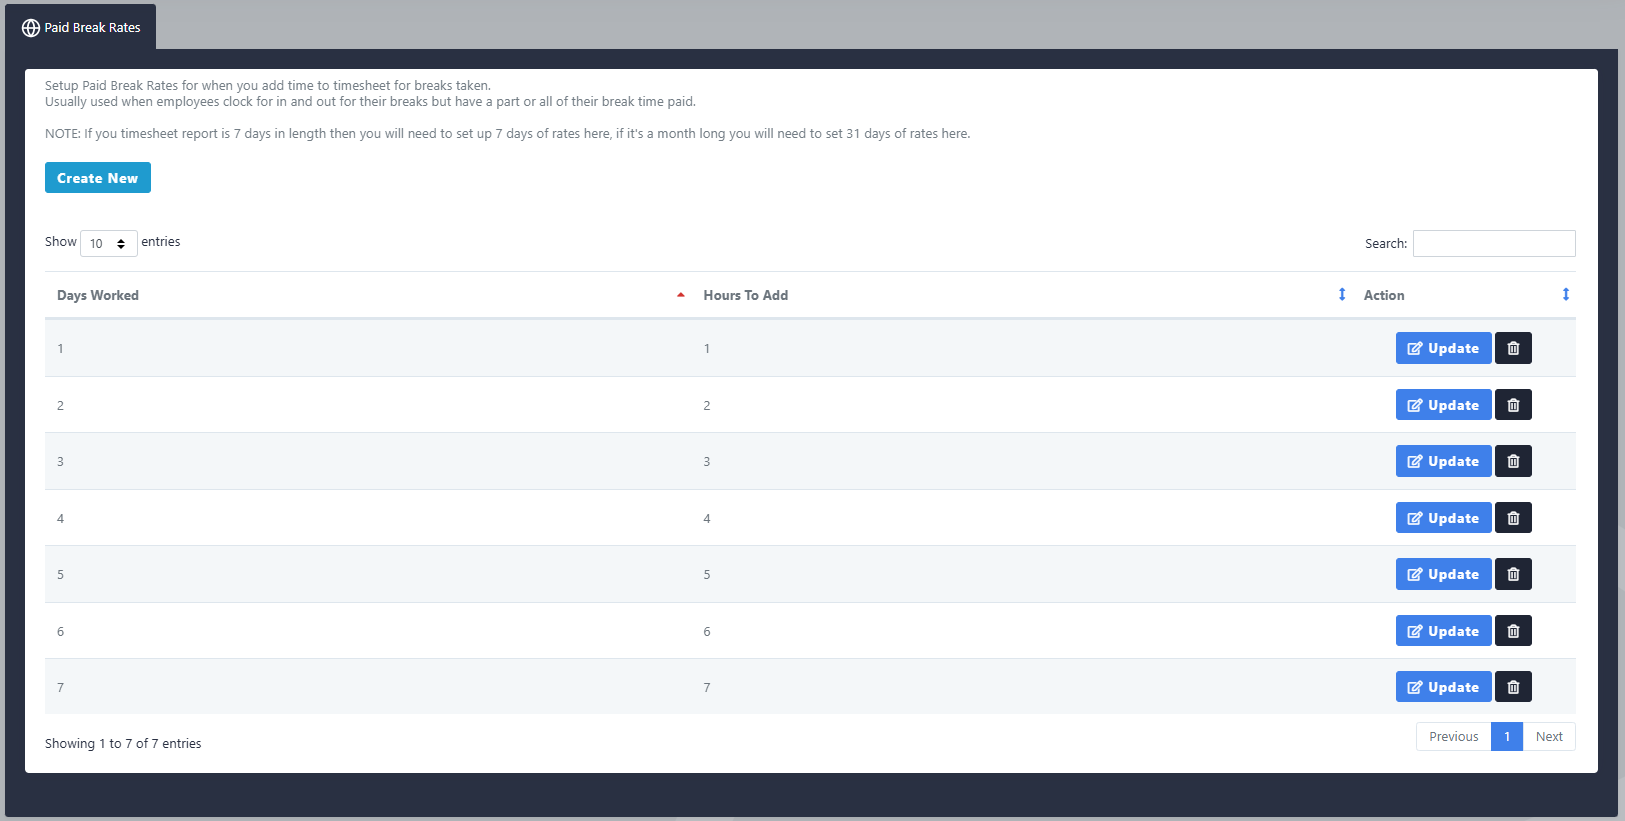
As configurações do Tempo de Repouso Pago aplicam-se apenas ao Relatório de Tempo de Repouso Pago e exigem que as Tarifas de Tempo de Repouso Pago sejam configuradas.
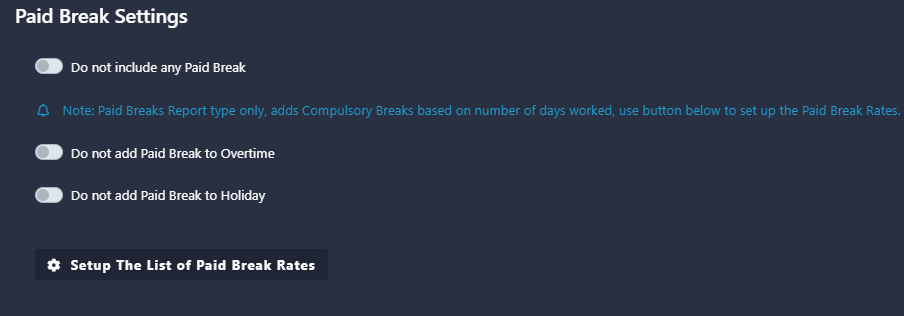
As Tarifas de Férias Pago devem ser configuradas de forma a cobrir o número diferente de dias que um funcionário poderá trabalhar no período de relatório. Isso garante que o Go2Clock possa calcular a devida tarifa de Férias Pago com base no número de dias trabalhados pelo funcionário. Essas tarifas podem ser configuradas navegando em Configurações > Tarifas de Férias Pago.
Exemplo
O relatório é gerado semanalmente e o funcionário tem direito a 1 hora de almoço remunerado por dia útil. As Tarifas de Intervalo Pago foram configuradas de forma a considerar cada número possível de dias úteis na semana. Se o funcionário trabalhar 4 dias, o relatório calcula o seu direito em 4 horas de intervalo remunerado.
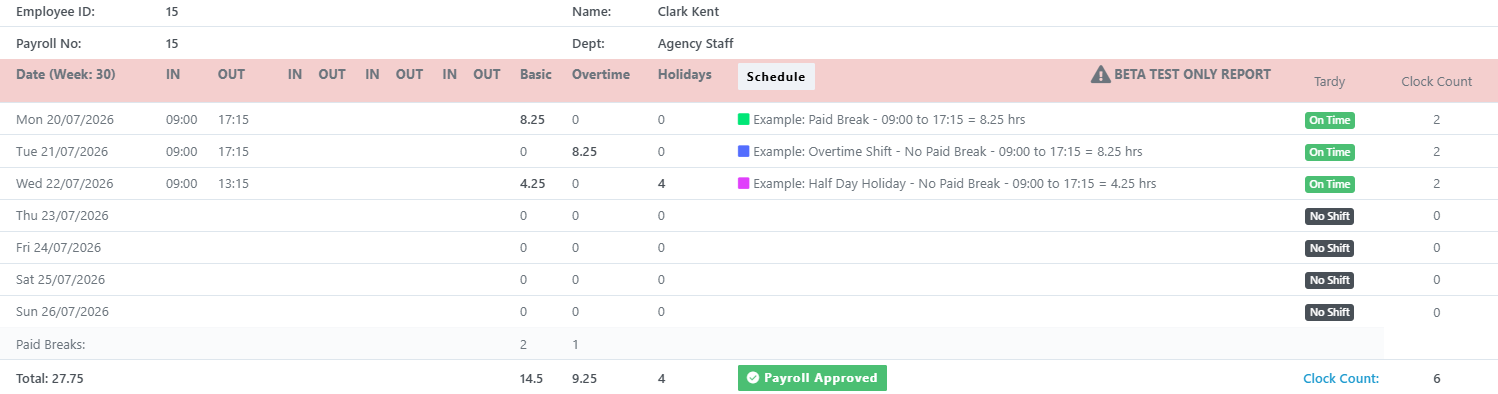
Quando ativado, nenhuma pausa remunerada é adicionada ao relatório para esse horário de trabalho.
Evita que o direito de folga remunerado do funcionário seja aplicado aos padrões de trabalho em turnos extras. Isso é útil quando a jornada de trabalho representa um período adicional de trabalho, em vez de um dia de trabalho normal.
Evita que o direito de folga remunerado do funcionário seja aplicado a rotinas de trabalho com intervalo de meia jornada. Isso é útil quando a rotina representa um período de trabalho parcial em vez de um dia de trabalho normal.
Exemplo
No primeiro cenário, o funcionário está trabalhando no horário normal, portanto tem direito à folga adicional de £10. Nos cenários dois e três, o funcionário está trabalhando em um horário de trabalho extra e em um horário de folga de meio dia, respectivamente. Como esses não são horários de trabalho regulares e integrais, a folga paga foi desativada para esses padrões, portanto o adicional de £10 não será aplicado.
Regras de férias/doença
Esta seção aborda como as férias de meio dia e o tempo de licença médica são configurados como rotinas de trabalho e como são registrados como tempo pago ou não pago.
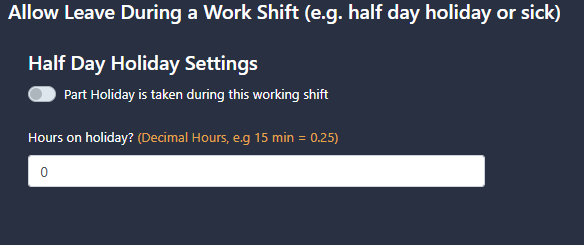
Férias de meio dia e turnos de doença devem ser criados como padrões de turnos separados, em vez de modificar o padrão de trabalho padrão. Caso contrário, isso resultará em horas de férias ou doença adicionadas aos seus dias de trabalho normais. A função clone pode ser usada para criar uma cópia do seu turno, para que você possa ativar as configurações de férias ou doença para criar o padrão de meio dia.
Configurações para férias de meio dia
Estas configurações determinam quantas horas do turno serão convertidas em horas de folga quando for concedida uma folga de meio dia. As folgas de meio dia precisam ser configuradas como turnos, para que as regras do turno ainda se apliquem às horas trabalhadas.
Instalações de Saúde Parcial
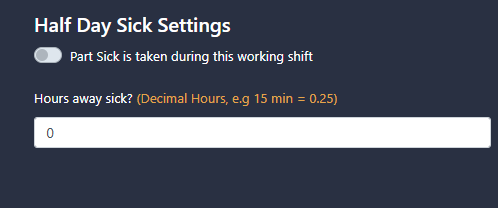
Essas configurações determinam quantas horas do turno serão convertidas em horas de doença quando um dia de folga de meio dia for utilizado. Assim como nos feriados de meio dia, o dia de folga de meio dia também precisa ser configurado como turno para que as regras do turno ainda se apliquem às horas trabalhadas.
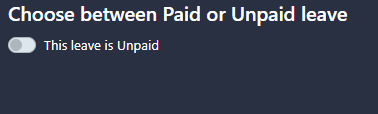
Escolha entre licença remunerada ou não remunerada
Quando ativada, as horas de férias ou de doença geradas por esse horário de trabalho são tratadas como licença não remunerada.
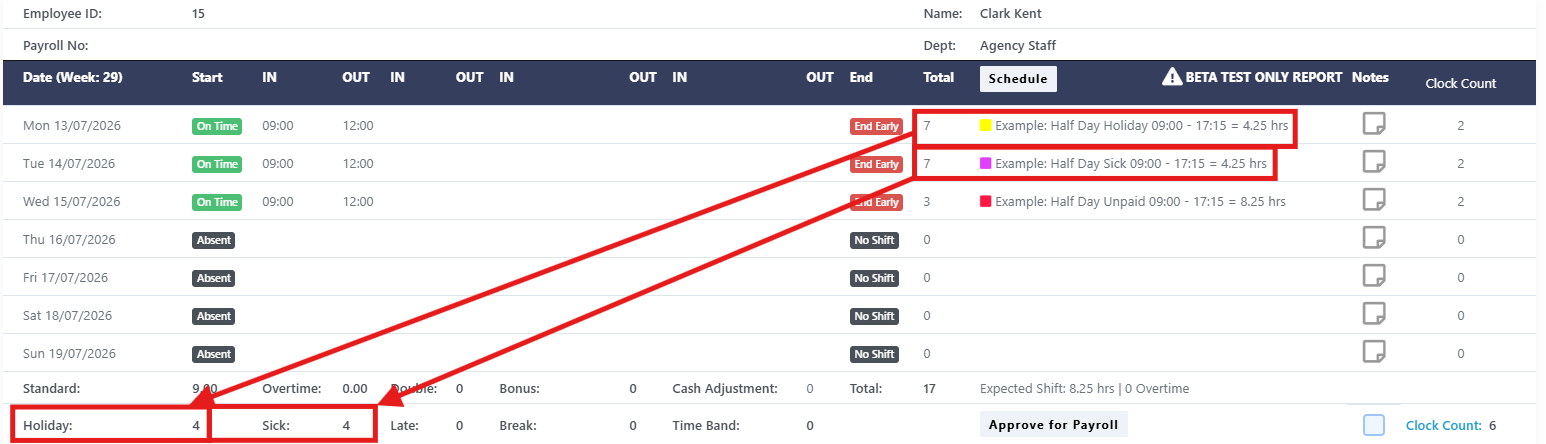
Exemplo
O primeiro cenário mostra um funcionário que tira um dia de folga remunerado, com 4 horas adicionadas ao total de dias de folga. O segundo cenário mostra o mesmo comportamento em caso de ausência por doença remunerada, com as horas adicionadas ao total de dias de doença. No cenário final, a licença é configurada como sem remuneração, portanto, embora a licença seja registrada, as horas não contribuem para o total do funcionário.
Regras de arredondamento
Esta seção explica como os tempos de trabalho são arredondados para fins de relatório e como os totais de horas extras podem ser arredondados separadamente das horas trabalhadas normais.
Rargação do tempo cronológico
O Rounding de Tempo pode ser aplicado aos tempos de trabalho dos funcionários, arredondando-os para o incremento escolhido. Este método é comumente utilizado para simplificar os totais salariais em vez de calcular os totais com base nos tempos de trabalho exatos. Se você precisar que o relatório seja baseado no minuto exato, essas opções podem ser deixadas em branco.
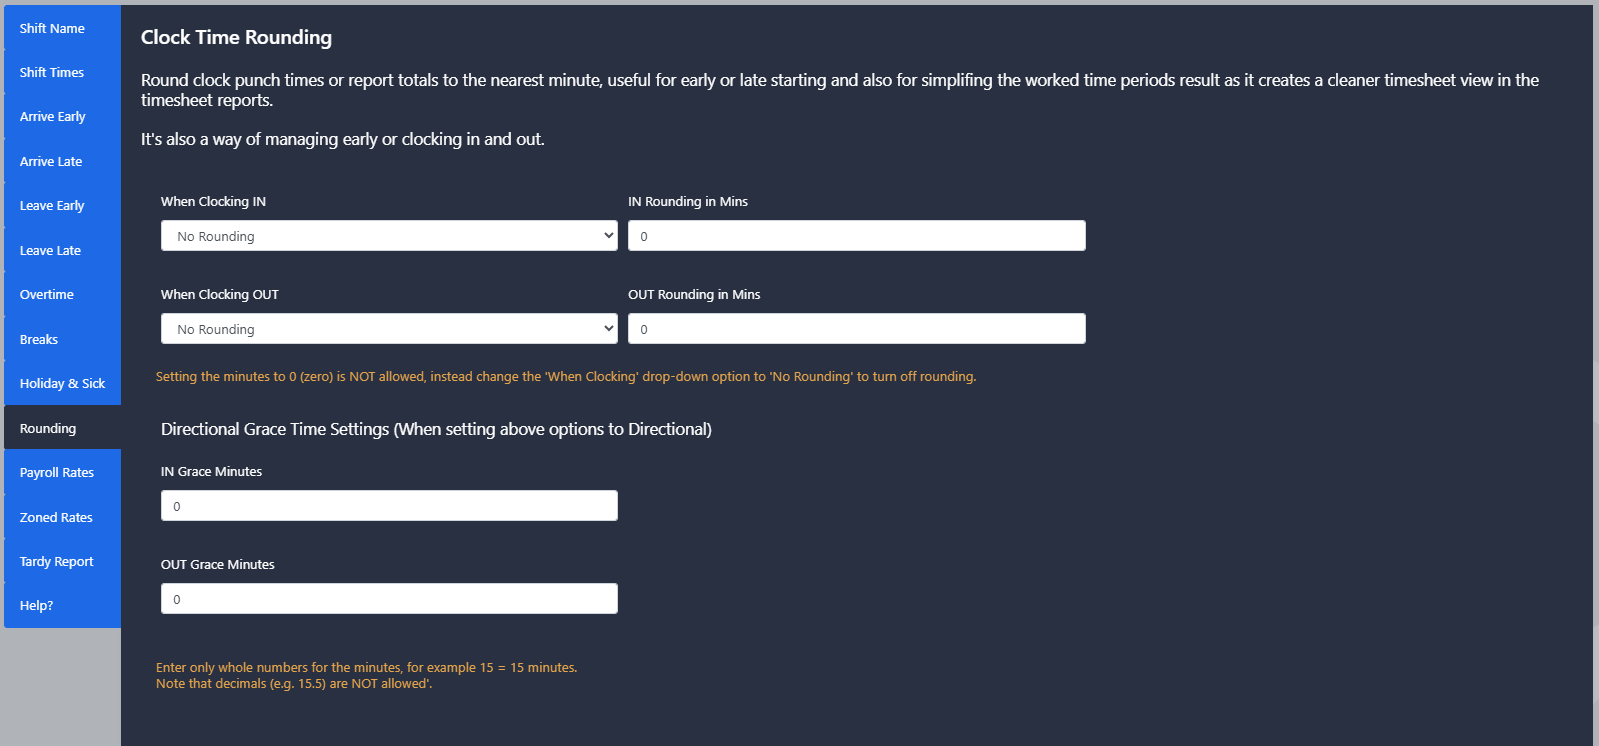
A arredondagem aplica-se ao estado do campo do relatório, e não ao estado do relógio transmitido pelo dispositivo. Dependendo da posição do relógio no relatório, isso determinará qual arredondamento será aplicado.
Defina o método de arredondamento aplicado separadamente para os tempos de entrada e saída do horário. As opções incluem arredondamento para cima, para baixo ou com direção com Grace. Os campos IN Rounding in Mins e OUT Rounding in Mins definem o incremento a ser arredondado.
O comando Directional with Grace rounding utiliza as configurações de tempo de grace abaixo para arredondar os valores numéricos se eles ocorrerem dentro do período configurado e para arredondar para cima na segunda metade do incremento.
Não é permitido definir os minutos em 0. Para desativar a arredondagem, altere a opção ‘Quando arredondar’ para 'Sem arredondamento'.
Os campos IN Grace Minutes e OUT Grace Minutes aplicam-se apenas quando o método de arredondamento acima está definido como Direcional. Eles definem o período de buffer utilizado para decidir se um cálculo de tempo arredondará para baixo ou para cima.
Digite apenas números inteiros para os minutos, por exemplo, 15 = 15 minutos. Não são permitidos decimais como 15,5.
Exemplo
No primeiro cenário, não há configuração de arredondamento de tempo, portanto os registros de tempo de trabalho do funcionário são calculados com precisão até o minuto. No segundo cenário, a configuração Direcional com arredondamento Grace é configurada com um aumento de 15 minutos, fazendo com que os registros de tempo de trabalho sejam arredondados para o próximo intervalo de 15 minutos baseado no período de tolerância configurado. No cenário final, a configuração Round Up é configurada com um aumento de 15 minutos, de modo que cada registro de tempo de trabalho seja arredondado para o próximo intervalo de 15 minutos, independentemente de quantos minutos tenham passado desde o intervalo horário indicado pelo funcionário.

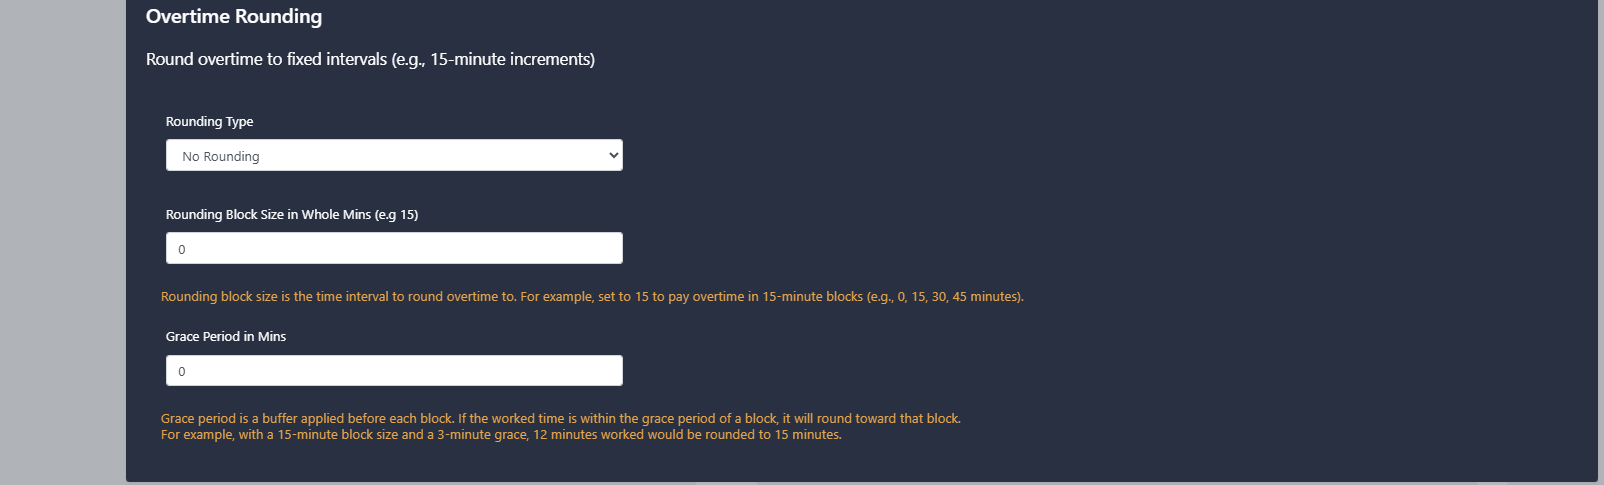
Rondagem de tempo extra
Por padrão, os cálculos de horas extras herdam as regras padrão de arredondamento de tempo configuradas para a jornada de trabalho. Se as horas extras forem arredondadas de forma diferente das horas trabalhadas normais, regras separadas de arredondamento de horas extras podem ser configuradas aqui.
Ao contrário das configurações padrão de arredondamento de horas, o arredondamento de horas extras não arredonda os valores de tempo exibidos no relatório. É aplicado apenas aos valores totais de horas extras calculados na parte inferior do relatório, mantendo os registros de tempo de trabalho do funcionário e as horas trabalhadas padrão inalterados.
Defina o método de arredondamento aplicado ao total de tempo extra, por exemplo, arredondando para o bloco mais próximo.
Defina o intervalo de tempo em que o sobretrabalho será arredondado.
Por exemplo, ajuste para 15 para pagar horas extras em blocos de 15 minutos (0, 15, 30, 45 minutos).
Um buffer é aplicado antes de cada bloco de arredondamento. Se o tempo trabalhado for dentro do período de tolerância de um bloco, ele será arredondado para esse bloco.
Por exemplo, com um tamanho de bloco de 15 minutos e um período de graça de 3 minutos, 12 minutos trabalhados seriam arredondados para 15 minutos.
Exemplo
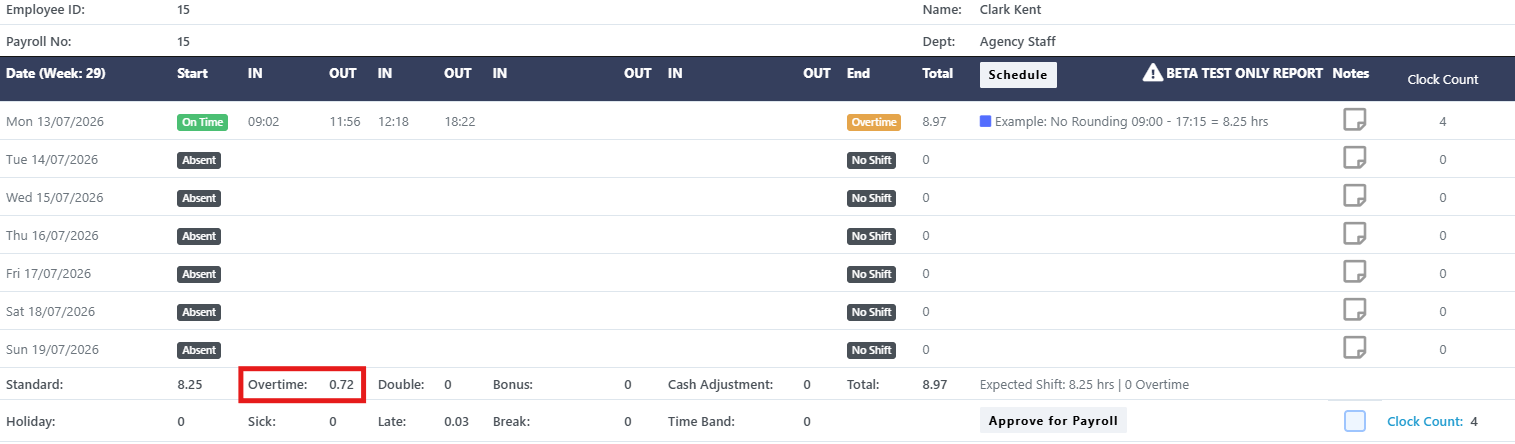
No primeiro cenário de relatório, nenhuma arredondagem de horas extras é configurada, portanto o total de horas extras do funcionário é calculado com base no número exato de horas extras trabalhadas.
Exemplo
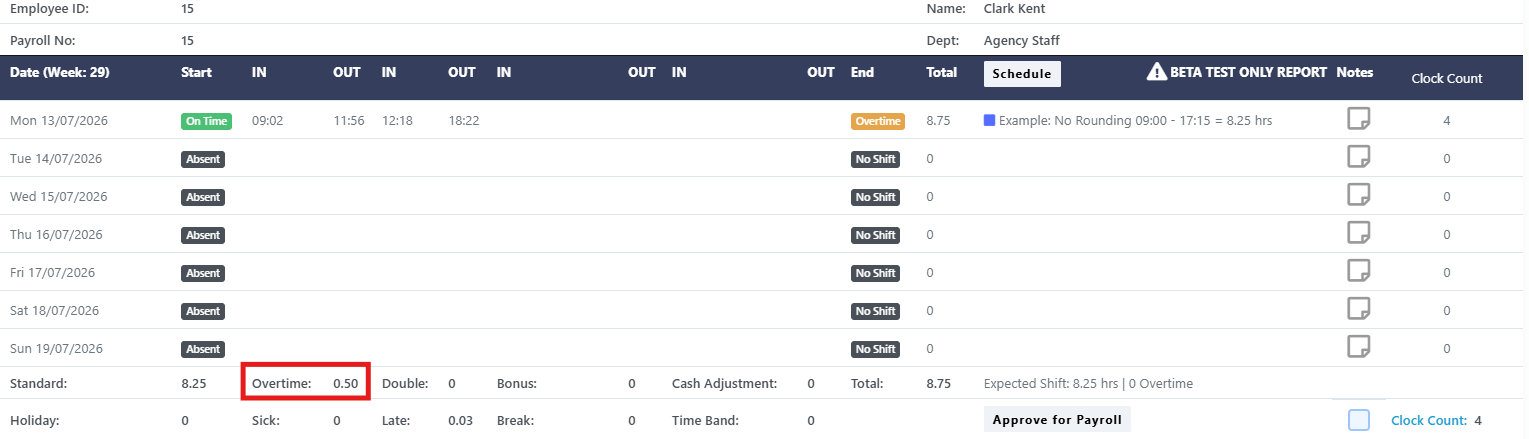
No segundo cenário de relatório, a arredondagem de horas extras é configurada para arredondar para o incremento mais próximo de 30 minutos. Portanto, o total de horas extras do funcionário é arredondado para o bloco de 30 minutos mais próximo.
Taxas de folha de pagamento
Esta seção aborda como os códigos de taxa de remuneração são atribuídos às horas trabalhadas em uma jornada de trabalho, bem como como são configurados os elementos de remuneração adicionais, como taxas de bônus e ajustes em espécie.
Taxas de folha de pagamento com padrão de mudança de horário
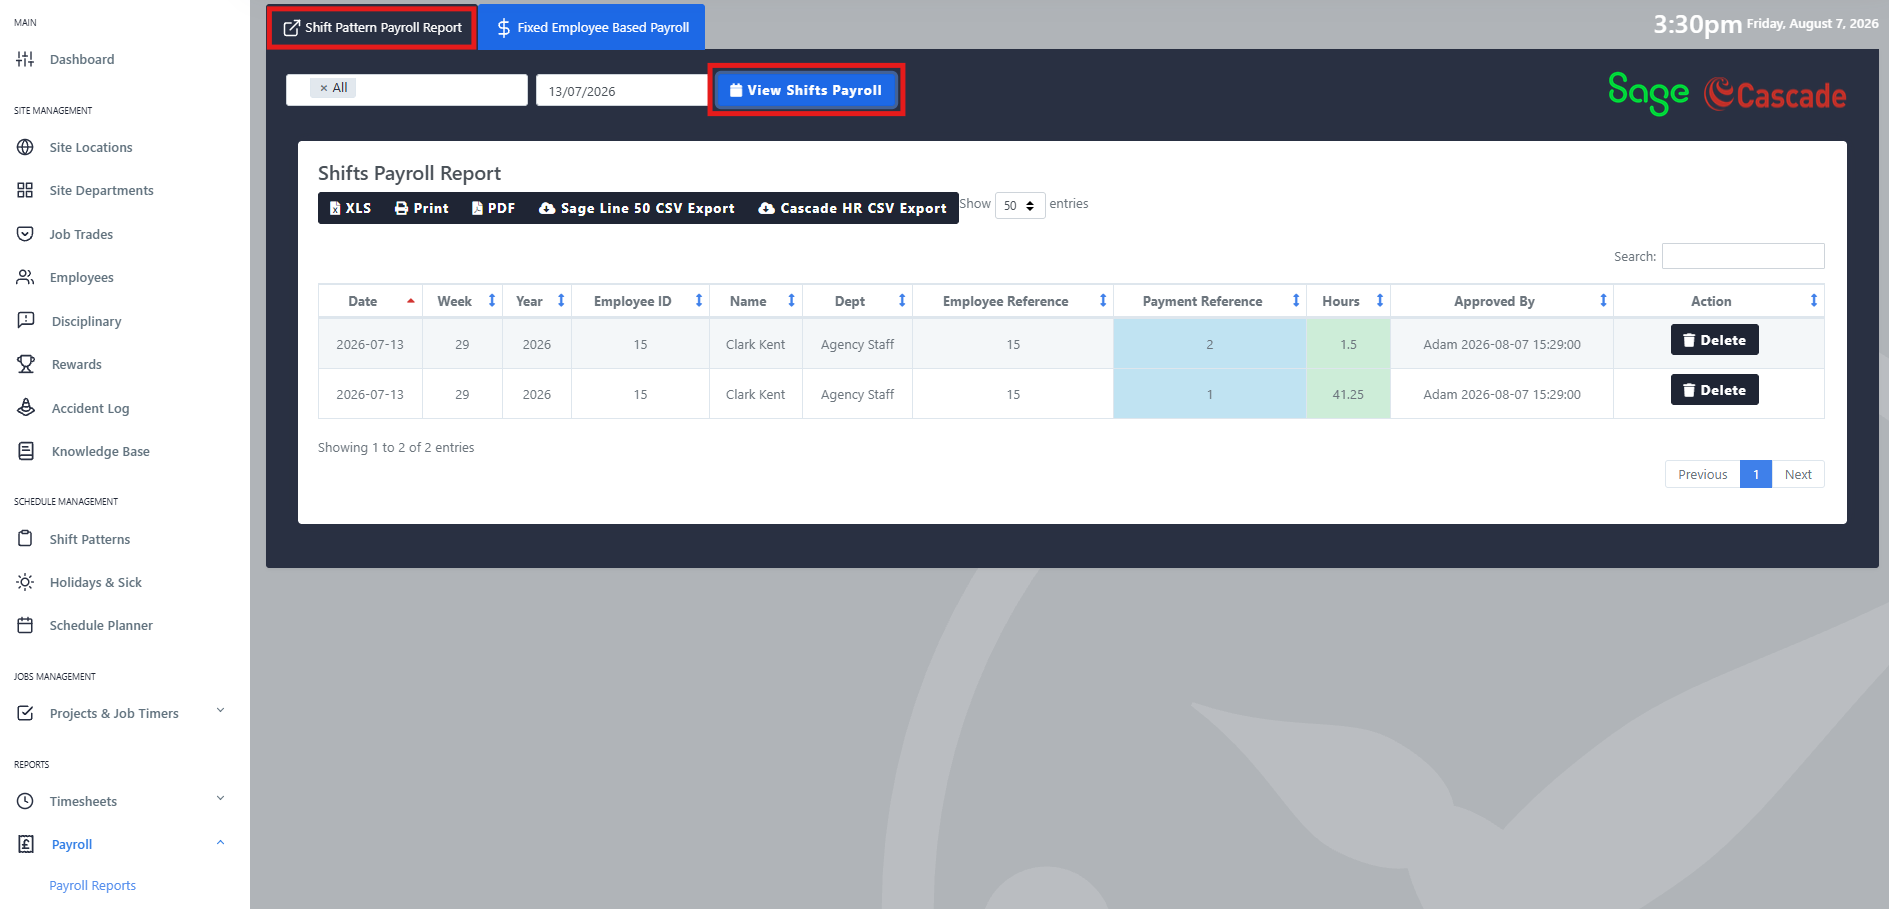
Atribua um código de referência para a geração de relatórios de folha de pagamento para cada tipo de taxa: Taxa Normal (tempo trabalhado dentro das horas da jornada), Taxa de Horas Extracontratadas (tempo trabalhado após as horas da jornada), Taxa de Férias de Meia-Dia e Taxa de Doença de Meia-Dia (aplicada a metade das horas da jornada), e Taxa de Tempo Band (tempo trabalhado dentro da faixa horária definida na aba de Horas Extracontratadas).
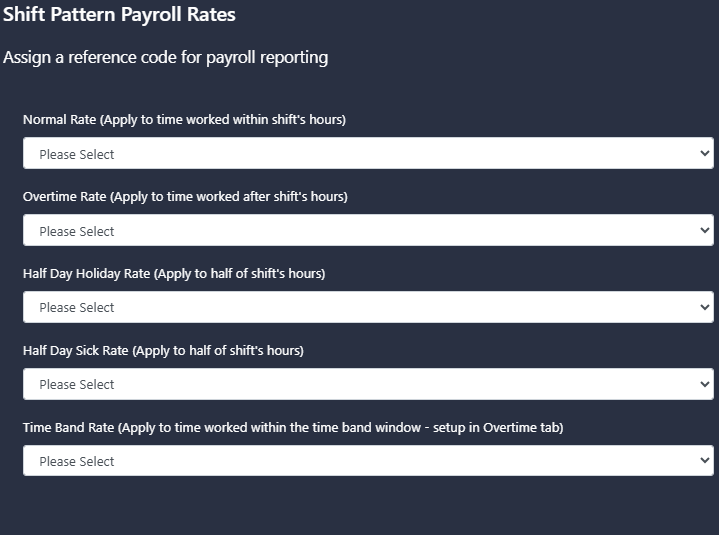
Os códigos de referência de taxas de pagamento são geridos a partir do botão "Configuração da lista de códigos de referência de taxas de pagamento" neste ecrã.
Exemplo
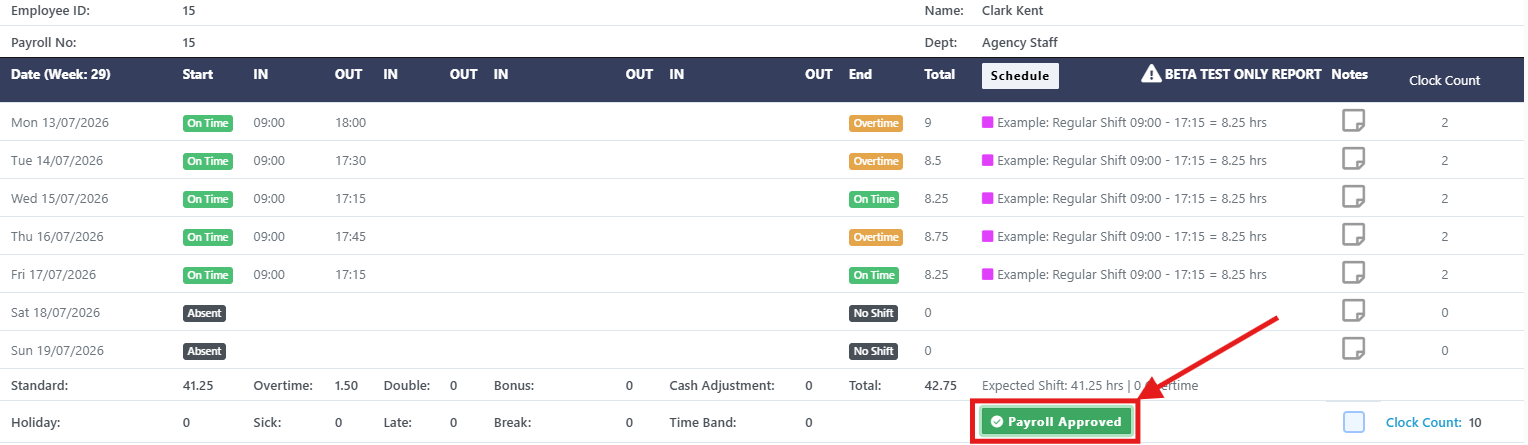
O funcionário concluiu uma jornada de trabalho que incluiu uma combinação de horas normais e de horas extras. Uma vez aprovado para o pagamento de folha de pagamento, as horas são atribuídas aos códigos de taxa de pagamento apropriados definidos no padrão de jornada e são exibidas no Relatório de Folha de Pagamento do Padrão de Jornada. Este relatório está pronto para ser exportado para o software de folha de pagamento.
Taxa de bônus
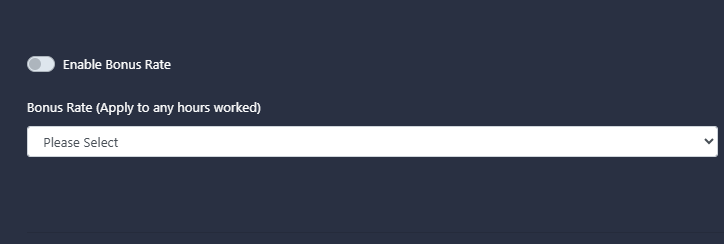
Quando a opção "Ativar taxa de bônus" estiver ativada, uma taxa de folha de pagamento adicional será aplicada a cada hora trabalhada na jornada. Essa taxa pode ser atribuída a um código de taxa de pagamento para que ela possa ser exportada para o Relatório de Folha de Pagamento do Shift Pattern.
Exemplo
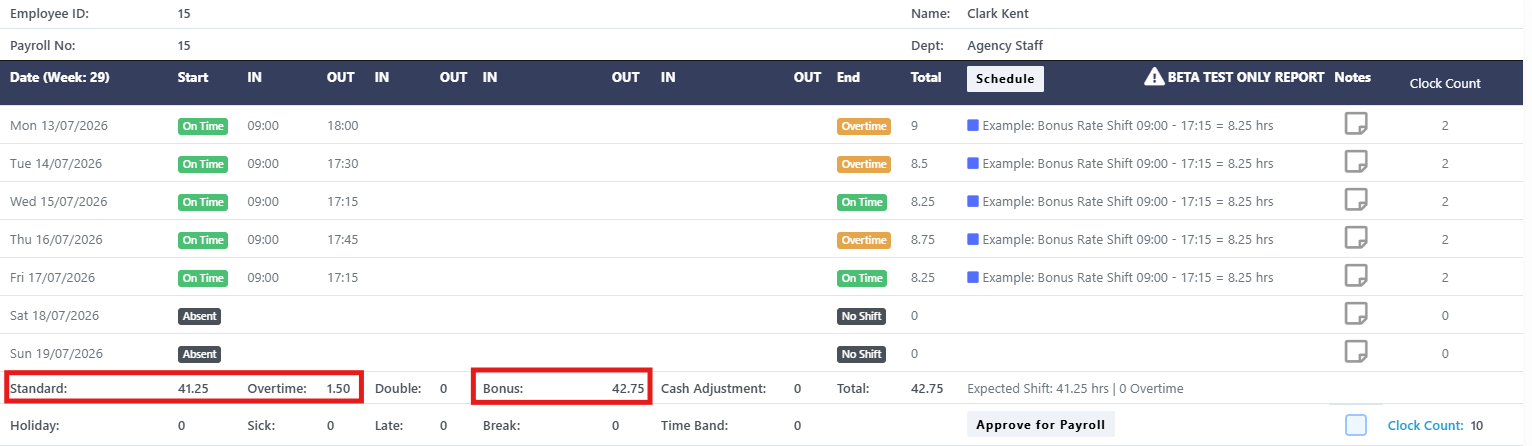
O funcionário trabalhou uma combinação de horas normais e horas extras. O regime de trabalho possui uma taxa de bônus ativa, de modo que as horas do funcionário também são atribuídas à taxa de pagamento de bônus. As horas normais e extras permanecem atribuídas às respectivas taxas de pagamento, enquanto as mesmas horas são adicionadas à taxa de pagamento de bônus no sistema de folha de pagamento.
Taxa de Relatórios de Tempo Extra Acumulado para esta Variação
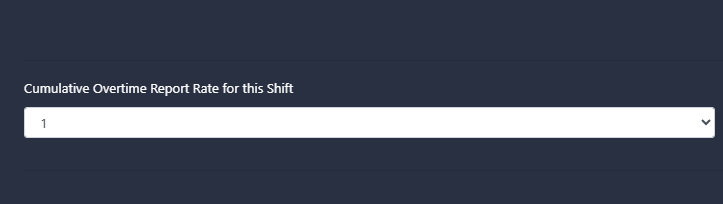
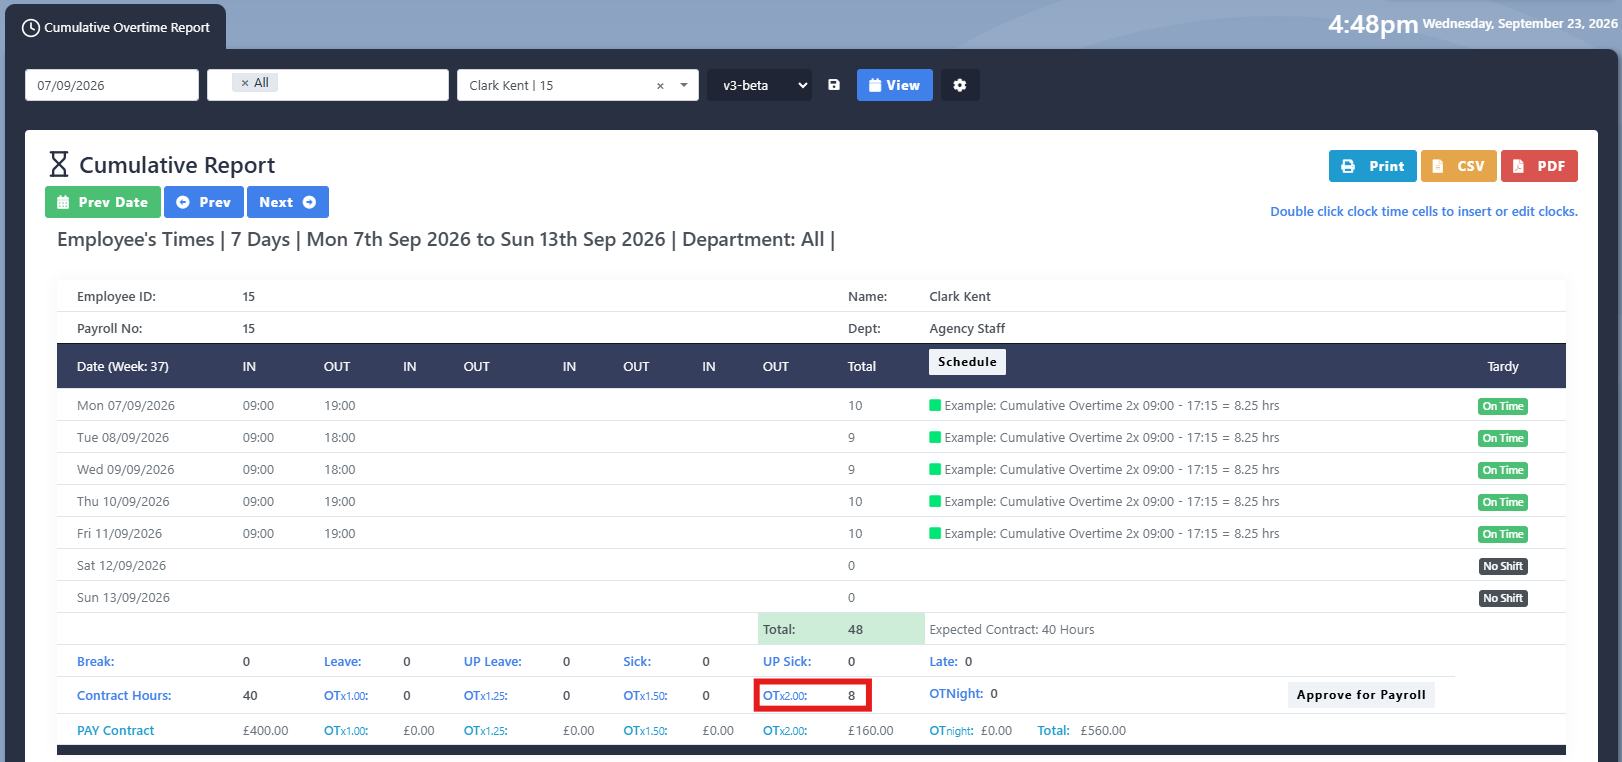
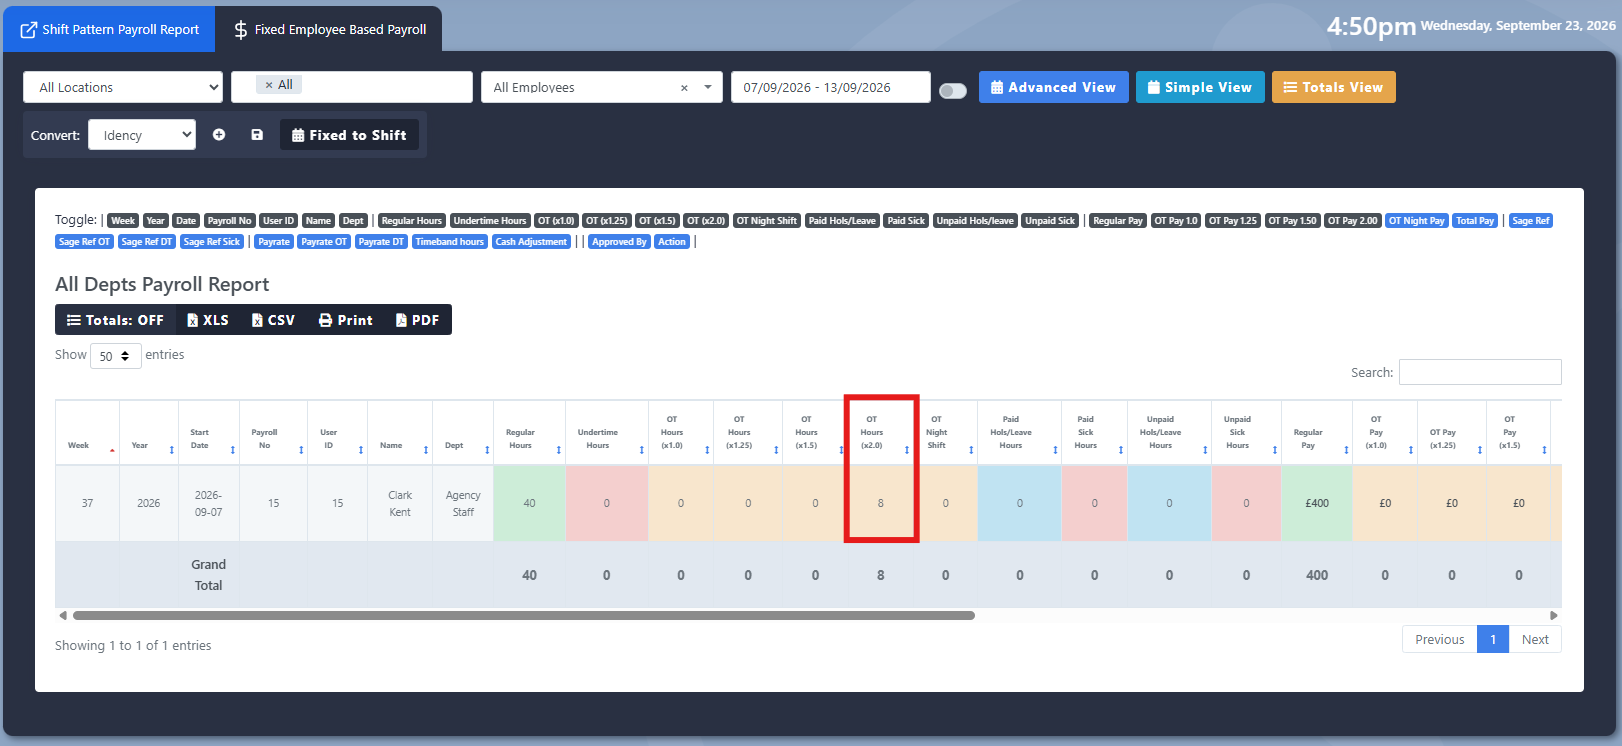
Determina qual campo de horas extras será preenchido no relatório cumulativo quando um funcionário acumule horas extras. O campo selecionado também afeta qual taxa de horas extras será exibida nos relatórios de Folha de Pagamento com Funcionários Fixos.
Exemplo
A Taxa de Relatório de Horas Extraordinárias é definida em x2. Portanto, quaisquer horas extras obtidas nesta jornada são atribuídas ao campo de horas extras x2 no Relatório de Horas Extraordinárias. Ao aprovar e exportar o pagamento de folha de pagamento, as horas extras também são atribuídas à taxa de horas extras x2 correspondente no relatório de Folha de Pagamento com base em funcionários fixos.
Ajustamento em dinheiro
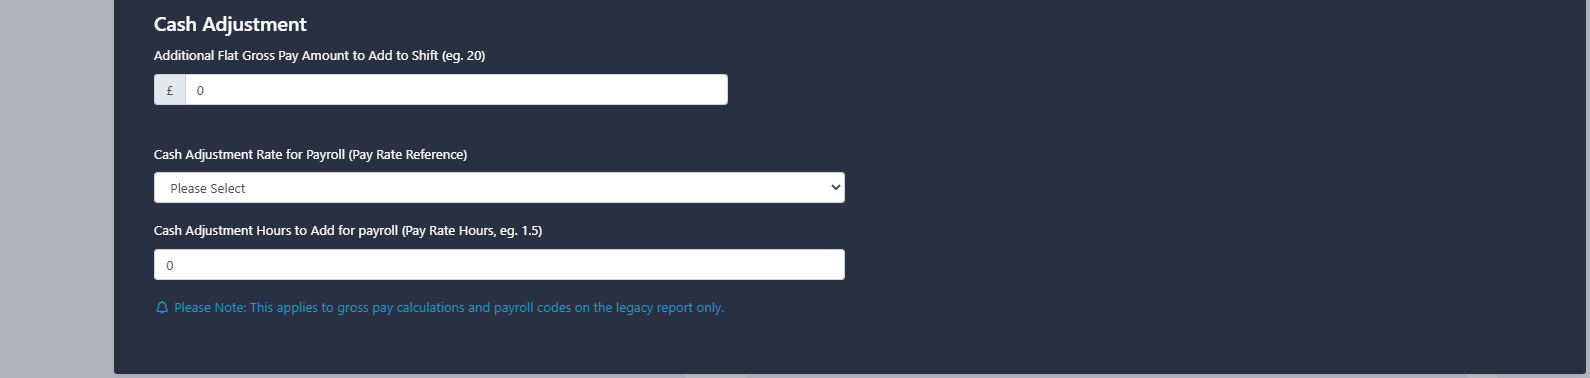
Uma Ajuste em Dinheiro permite atribuir um valor monetário fixo a uma função. Quando um funcionário trabalha nessa função, o valor configurado (Valor Fixo Bruto Adicional a Acrescentar à Função) é adicionado à folha de pagamento do funcionário, independentemente do número de horas trabalhadas. Esse valor em dinheiro é exportado para o Relatório de Folha de Pagamento de Funcionários Baseados em Horas como um ajuste monetário. Se for necessário também apresentá-lo no Relatório de Folha de Pagamento por Funções, um Código de Taxa de Salário pode ser atribuído através do Taxa de Ajuste em Dinheiro para Folha de Pagamento.
As horas de ajuste em dinheiro para adicionar no pagamento de folha de pagamento determinam quantas horas são atribuídas para cada código de taxa de pagamento selecionado para cada turno trabalhado. Isso permite que o ajuste em dinheiro seja representado como horas no Relatório de Folha de Pagamento por Turnos, mantendo a valor monetário para o pagamento de folha de pagamento por tempo fixo.
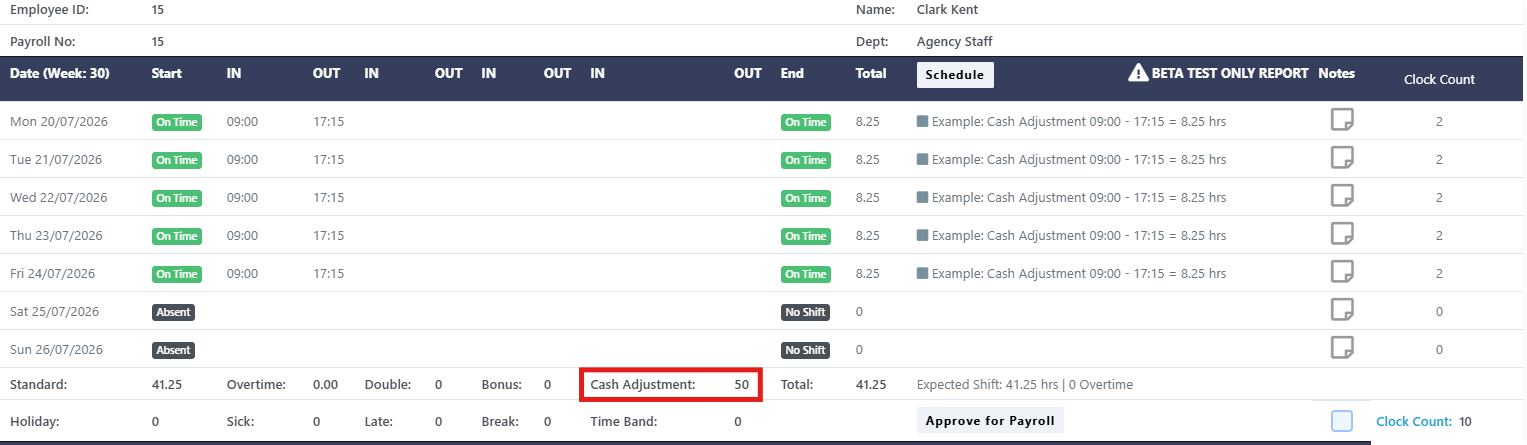
Exemplo
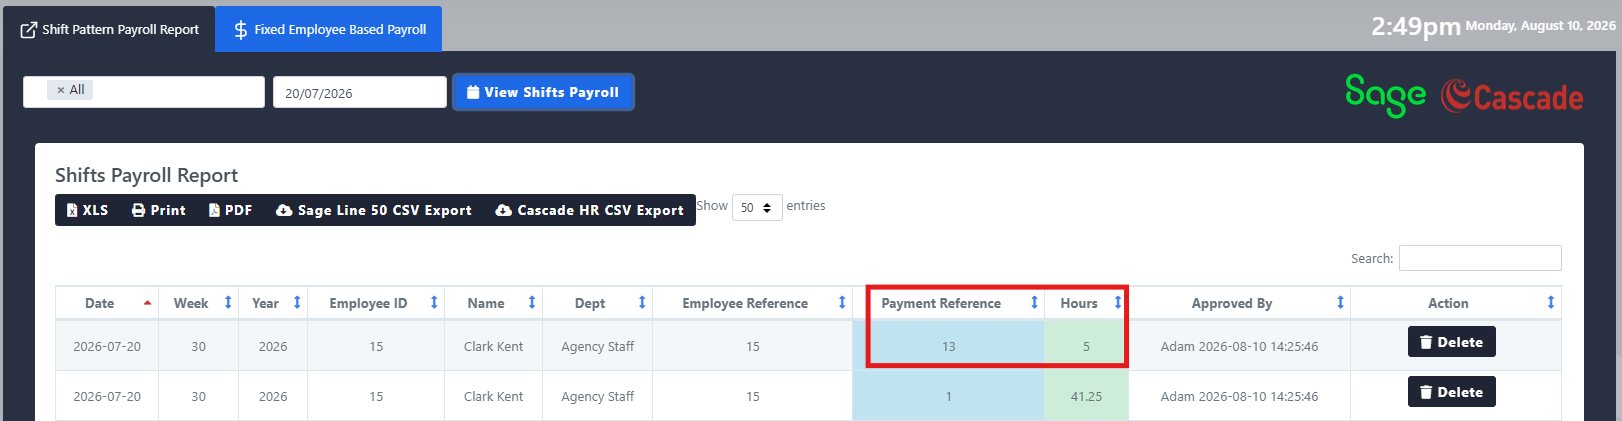
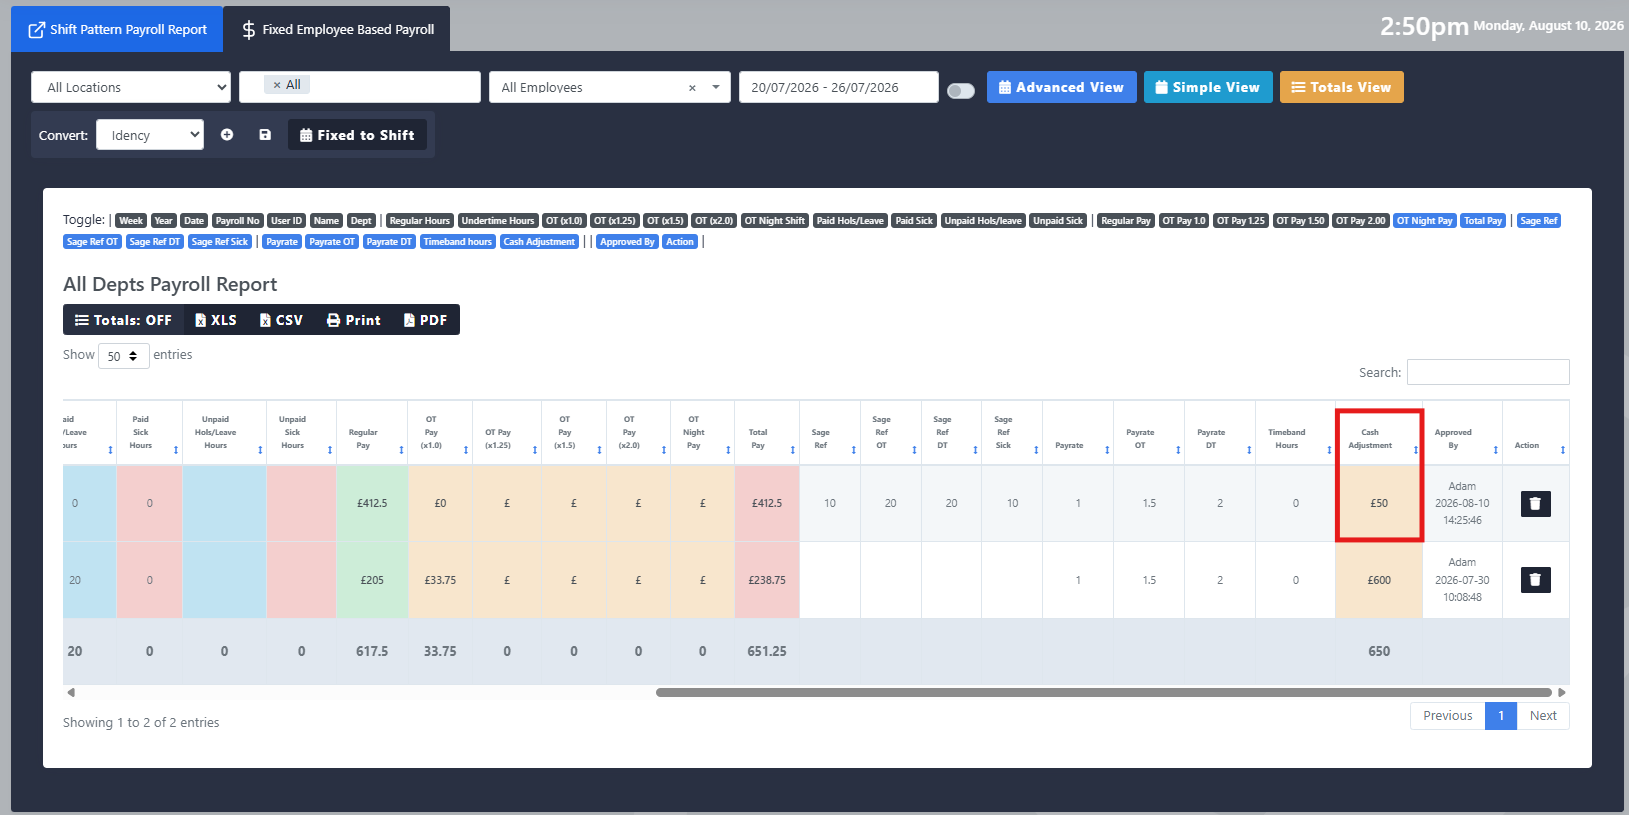
A alteração possui uma configuração de Ajuste de Dinheiro de £10, o que significa que o funcionário recebe um adicional de £10 por cada dia em que trabalha na mudança, independentemente do número de horas trabalhadas. O Ajuste de Dinheiro para Adicionar no Relatório de Salários é definido em 1 hora, portanto, 1 hora é atribuída ao Código de Taxa de Pagamento selecionado no Relatório de Salários por Modos de Trabalho. Uma vez aprovado, o Relatório de Salários por Modos de Trabalho mostra o ajuste de £10 na coluna Ajuste de Dinheiro, enquanto o Relatório de Salários por Modos de Trabalho registra o equivalente de 1 hora contra o Código de Taxa de Pagamento selecionado.
Relatório de Horários por Zonas – Horários e Tarifas de Pagamento
As Tarifas por Zonas permitem que até quatro faixas salariais distintas sejam aplicadas durante períodos pré-definidos ao longo do dia. Ao contrário dos cálculos de horas extras, esses períodos são fixos e não são afetados por outras regras de rotina de trabalho. Uma única jornada de trabalho pode ser dividida em várias zonas salariais, cada uma com sua própria taxa de pagamento e multiplicador de taxa de pagamento.
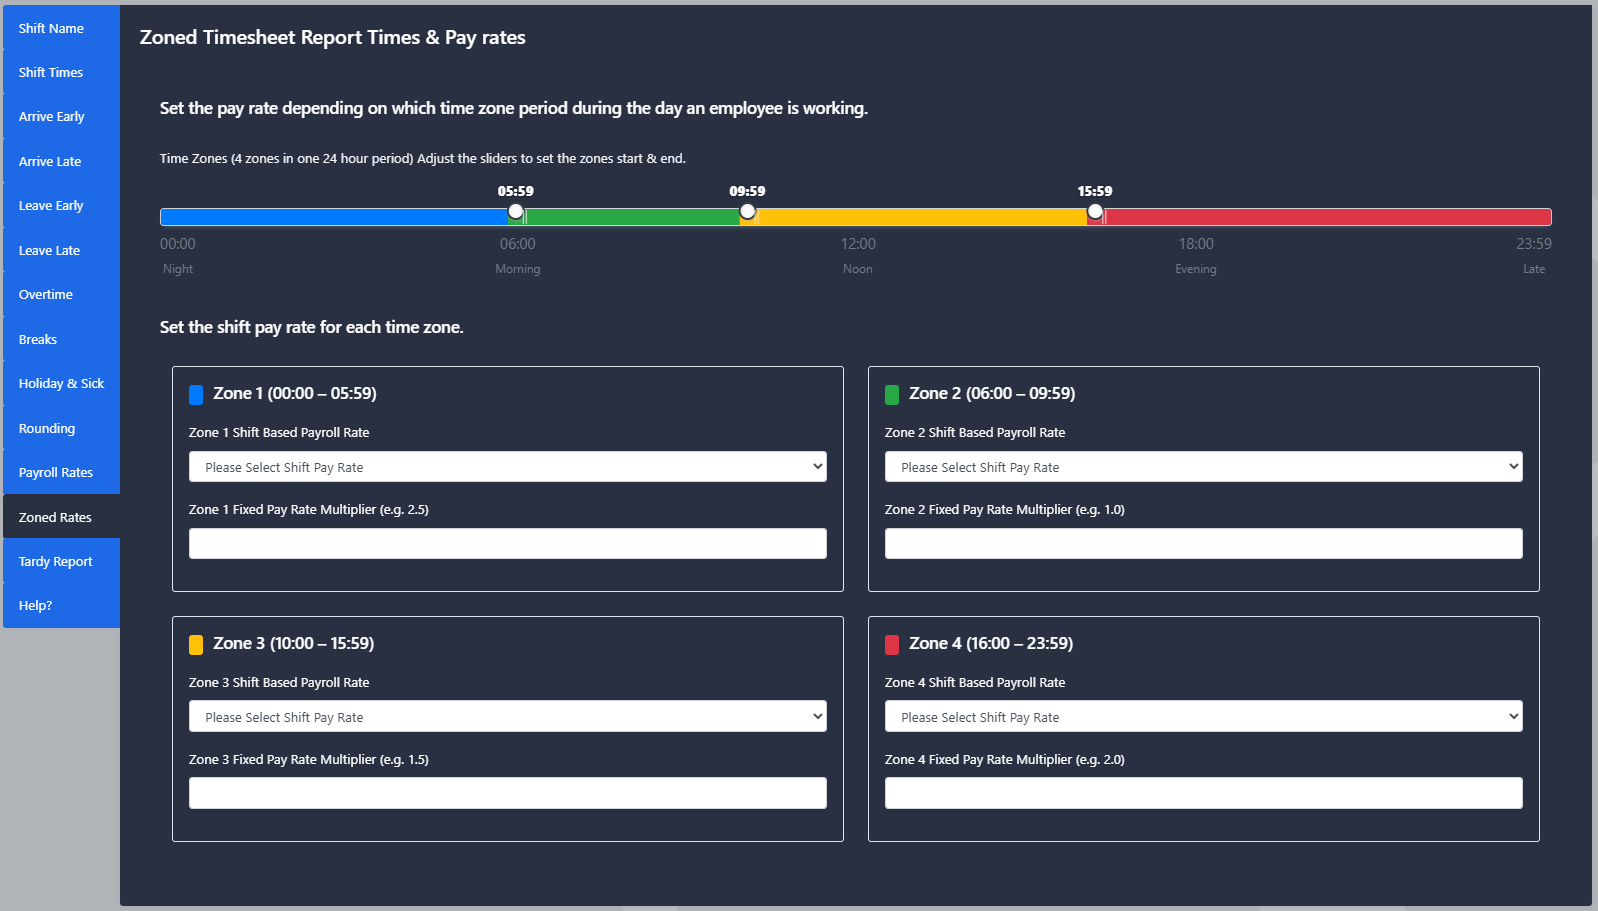
Isso só funciona com o Relatório por Zonas nos relatórios de padrões de turnos.
Exemplo
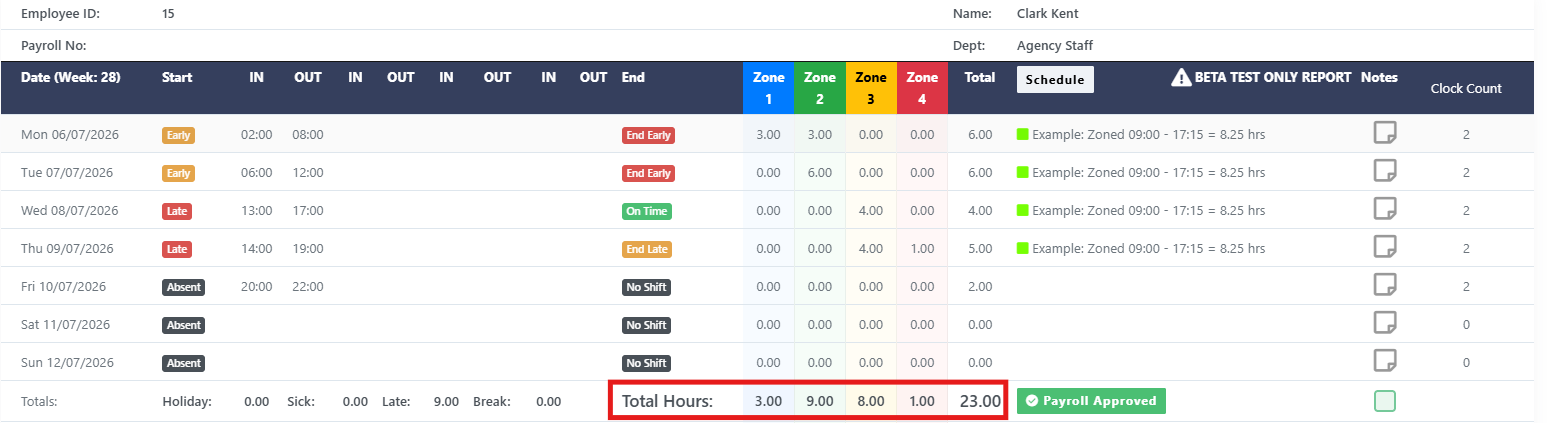
O funcionário trabalha em horários diferentes ao longo da semana, com partes de cada turno estando dentro de diferentes faixas salariais. O Relatório de Filação aloca as horas trabalhadas à zona apropriada com base nos períodos de tempo configurados, permitindo que cada seção do turno seja paga com a taxa correspondente.
Extras
Esta seção aborda as funcionalidades adicionais de relatórios disponíveis no âmbito dos padrões de trabalho.
Envie um Relatório de Desconhecimento por E-mail
O Relatório Tardy permite enviar automaticamente informações sobre a frequência de presença aos gestores dos funcionários que deverão trabalhar nessa jornada no dia atual. Normalmente, esse processo é iniciado cerca de uma hora após o início da jornada, para garantir que ausências e chegadas tardias sejam claramente identificadas.
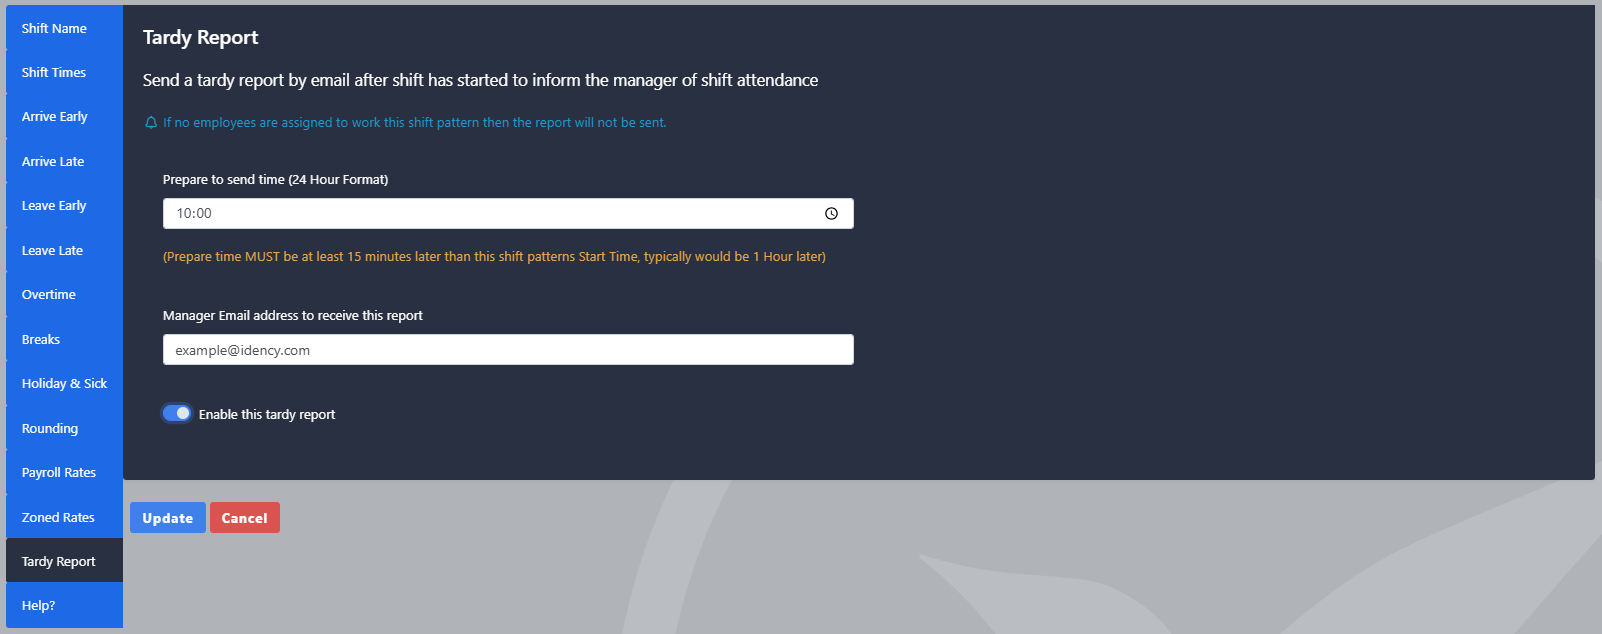
O campo de e-mail suporta até 100 caracteres, permitindo que vários destinatários sejam inseridos desde que estejam separados por uma vírgula e um espaço. Se você precisar que mais de dois gerentes recebam o relatório de atraso, recomendamos configurar um e-mail padrão que possa redirecionar automaticamente o e-mail para os gerentes relevantes.
Exemplo
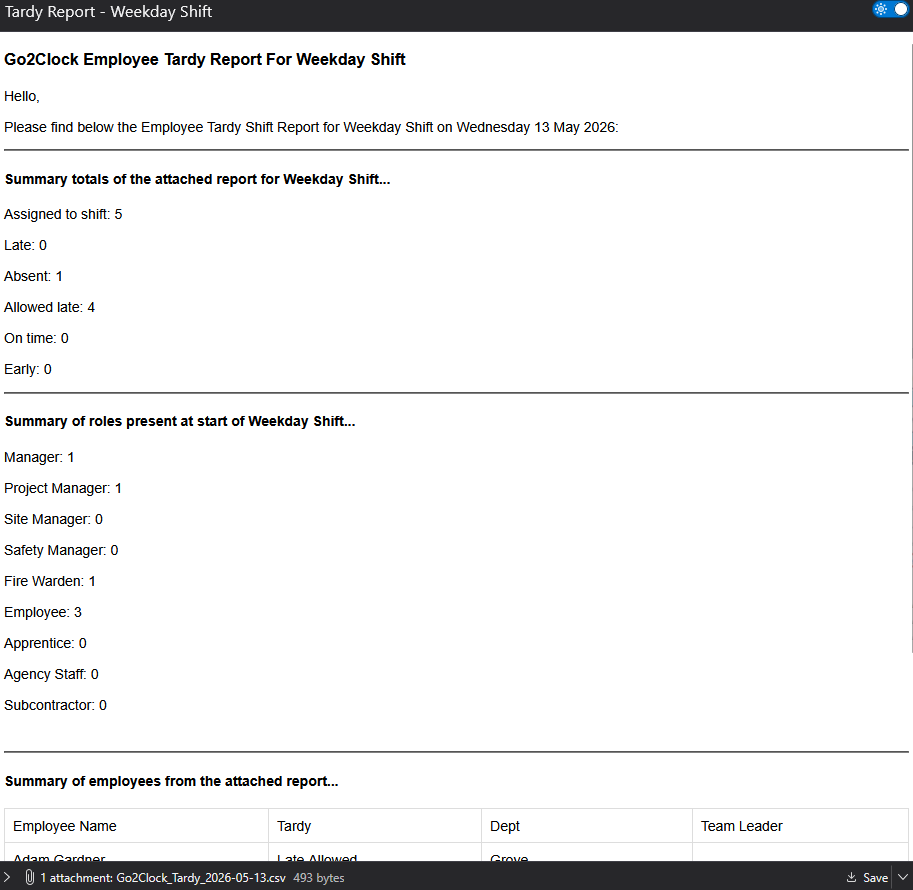
No horário configurado, os gestores recebem um e-mail com uma síntese da frequência de presença dos funcionários durante a jornada de trabalho. O e-mail inclui um arquivo CSV contendo o horário de entrada de cada funcionário, juntamente com o status correspondente de atraso, permitindo que os gestores identifiquem rapidamente os funcionários que estiveram presentes, atrasados ou ausentes.
Precisa de ajuda para configurar seus horários de trabalho?
Entre em contato e nós explicaremos os ajustes e como eles se aplicam ao seu negócio.

Sistema de Picagem e Assiduidade Hospedado na Nuvem Go2Clock

















 English (UK)
  English
  English (Canada)
  Français du Canada
  Svenska
  Português
  Nederlands
  Italiano
  Français
  Español
  Deutsch